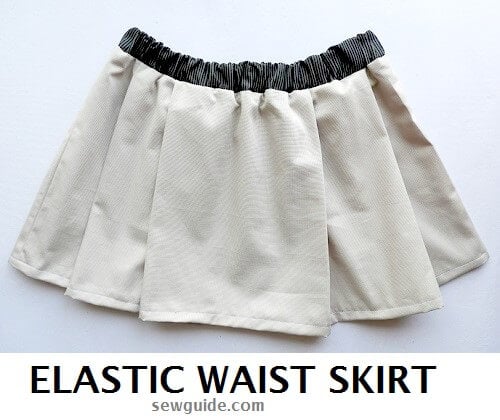
Flared elastic waist gathered skirt pattern
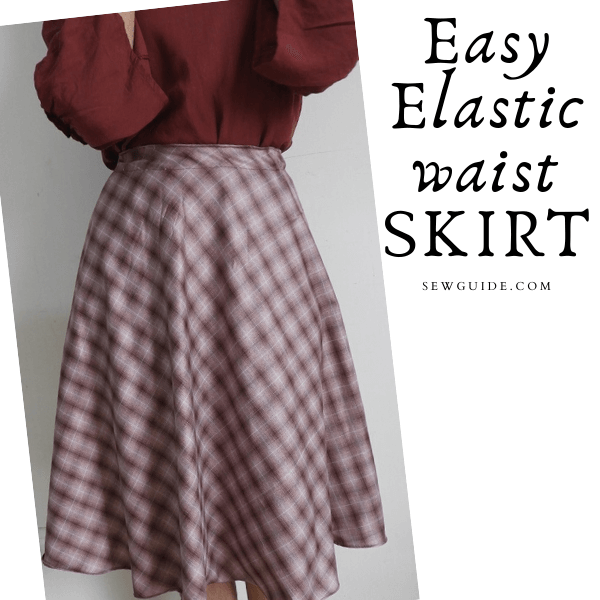
This is a very simple tutorial to sew an elastic waist skirt which has minimum gathers around the waist unlike other gathered elastic skirts but with great flair.
I sew this simple and easy skirt pattern in less than half an hour. Even an absolute beginner can confidently start this skirt and finish it to perfection.
Infact it is the EASIEST SKIRT EVER. SKirts with elastic waists are also very comfortable to wear as it gives enough ease at the waist and with the A line shape given by the flair it is flattering to all types of figures as well.
Steps to sew a simple gathered skirt
Step 1 – Take Body measurements
For making a skirt, unlike any other garment, you do not have a hundred measurement details to take care of. You just need three measurements
Length needed
If I was making this skirt for myself, I would hold the tape at my waist and drop it down to the length I need.
Add 1/2 inches to the length needed, for waistband seam allowance and 1/2 inch for rolled edge hem.
Measurements needed
Body round. At the bust level take the measure around the body over the arms ( This may surprise you because everywhere else you have been taking measures at the hip. But this works because you will be putting on this skirt through the head. This will make a skirt with little gathers.)
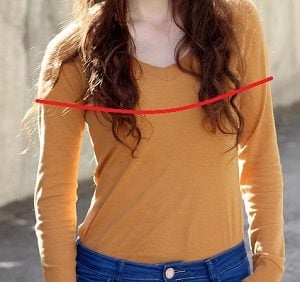
Waist round ( where you will keep your waistband of the skirt) This is for measuring the elastic
Length – Length needed for the skirt.
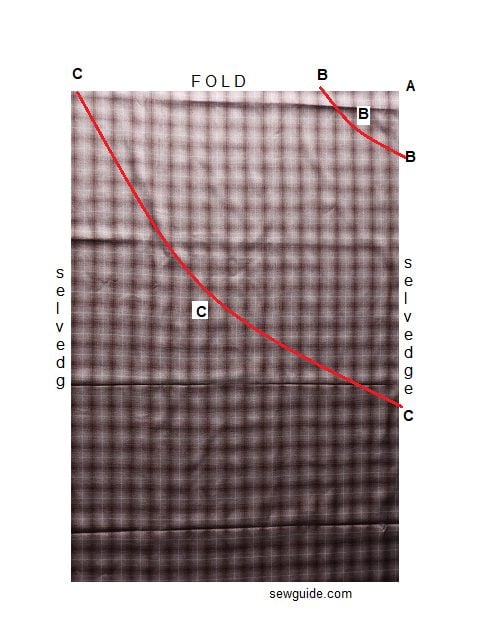
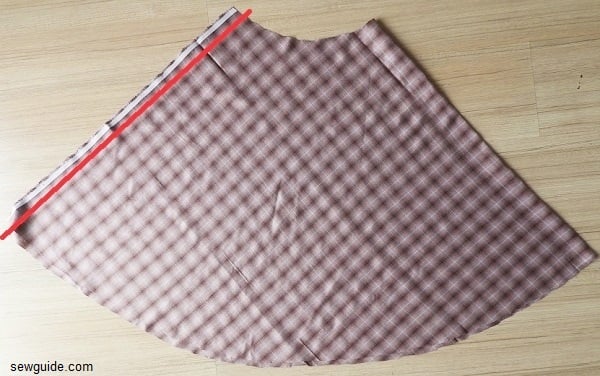
To make the pattern fold the fabric by half crosswise. Mark the above measures.
A- B is the number you got marked from the corner. Make several dots. Then join these dots – along B’s – to form the waistline .
Then Mark C from B – the length of the skirt with seam allowance of waist and hem allowance added.
A-B = ( measure around the body at bust level over arms + 10 inch (more if you have a tummy )/ 6.28
B-C = Length you need for the skirt.
Fabric choice for this simple skirt
You have so many options to sew this skirt. Make it in a beautiful lace fabric or a flowy chiffon or a plaid fabric – make it in all the fabric you have in your stash as I really want to. You just need to have one and a half meters of fabric with at 44 inch width to make a skirt of the length I have sewn.
What are the things you need to make this simple skirt
Sewing machine
elastic 3/4 inch or 1 inch ( Length – your waist measurement)
Fabric
Scissors
Pins
Safety pin
Marking tool
measuring tape
matching thread
Iron
I have taken pictures at every step so that you will not be confused at any stage. It also helps that this is a very easy skirt to sew with very few steps.
Step 2. Cut the fabric into the pattern piece
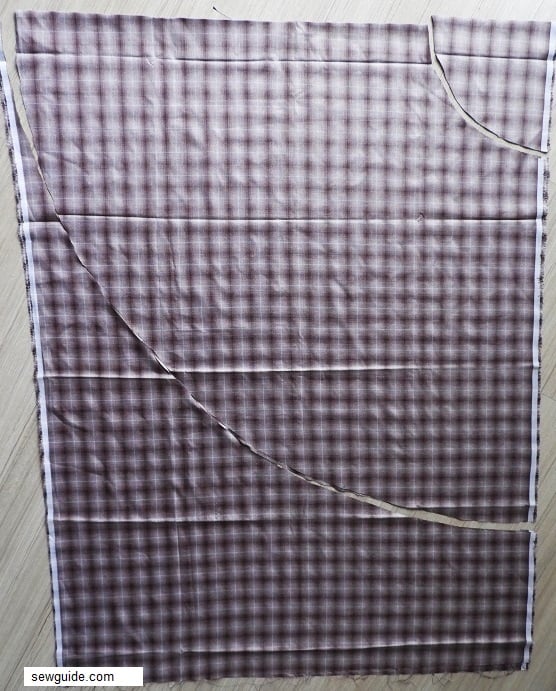
Check out the Perfect way to cut fabric you want more information on how to cut fabric before sewing.
Step 3. Align the selvedges of the fabric piece and sew together
Keeping the selvedges together (right sides together); sew them together with a seam allowance of atleast 1/2 inch. Skirt is almost ready. Cutting the pattern is the most difficult part of this skirt
The seams have to be pressed open with an iron, so that there is no bulk in the waistband or hems when you sew them.
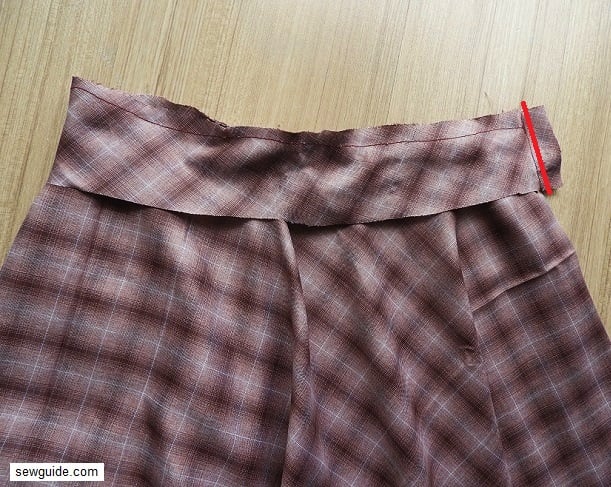
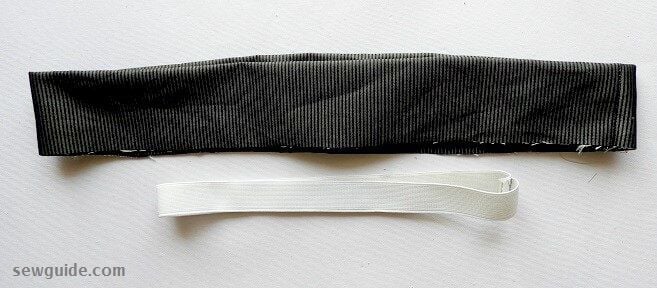
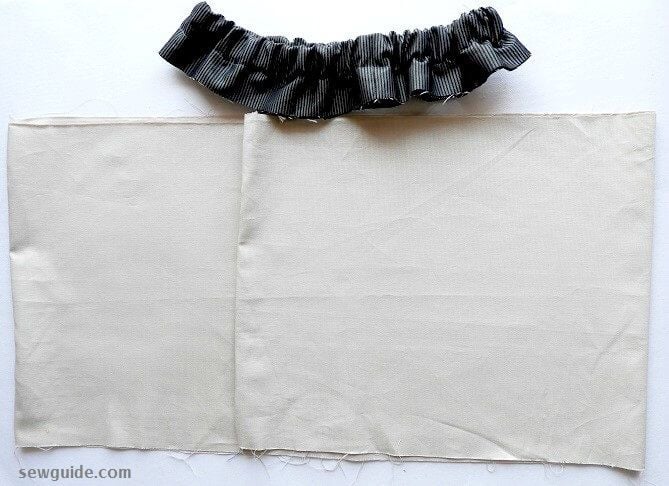
Step 4. Sew the skirt waistband for elastic
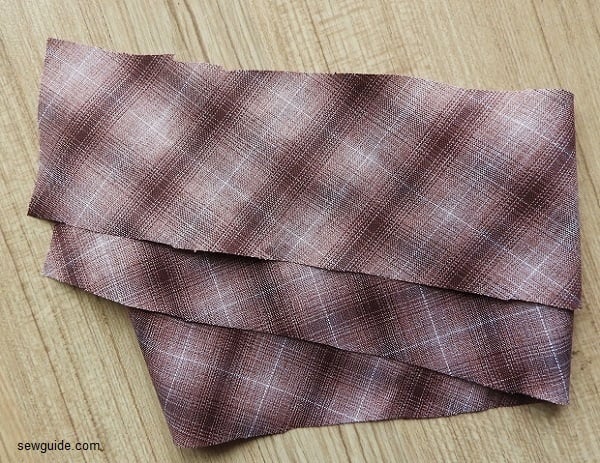
I cut a 1.5 inch Bias strip of the same material and made a facing for the waistband.
Stitch it to the waistband rightsides together
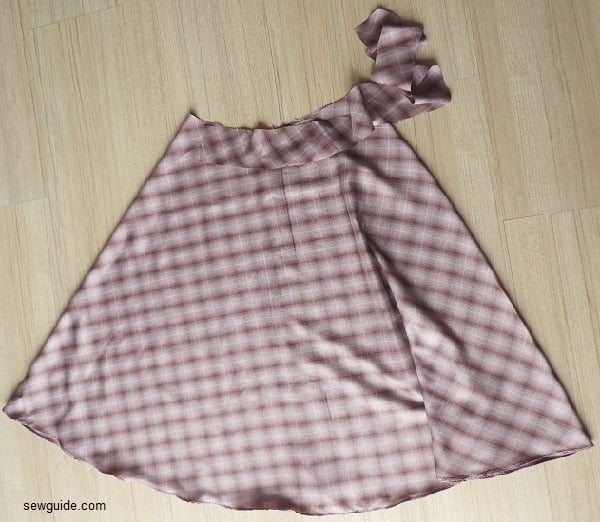
This will make a casing for a 1/2 inch – 3/4 inch elastic. Ensure that you do not stitch 1/2 inch from the start of the edge of the bias tape.
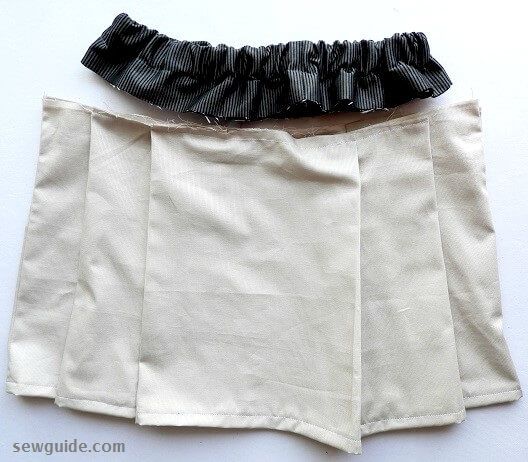
When you reach the end, sew the short edges together.
Turn the tape to the wrong side and press. Then turn 1/4 inch to the inside.
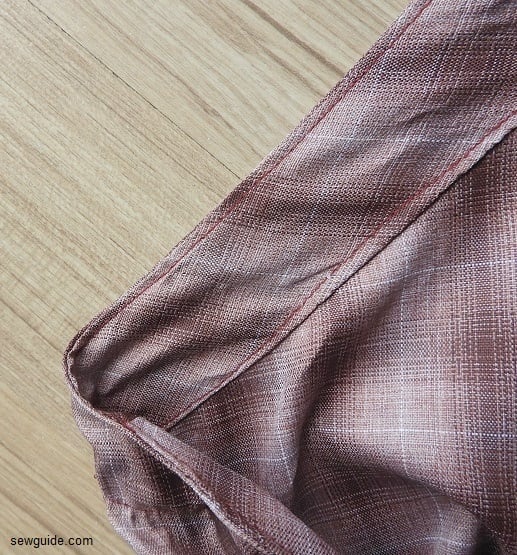
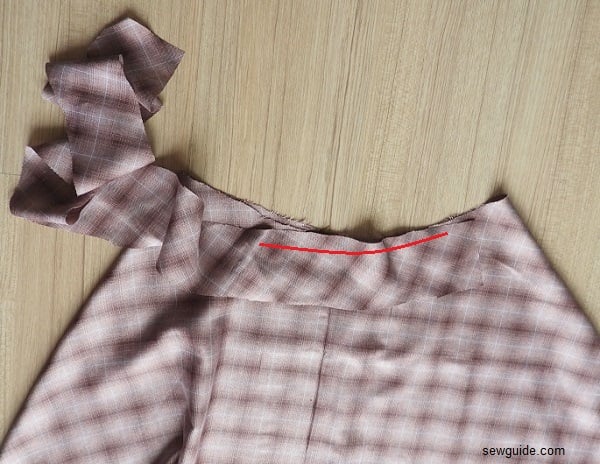
Sew along the fold edge from inside. Do not forget to Leave a 1 inch opening unstitched in the waistband to insert elastic
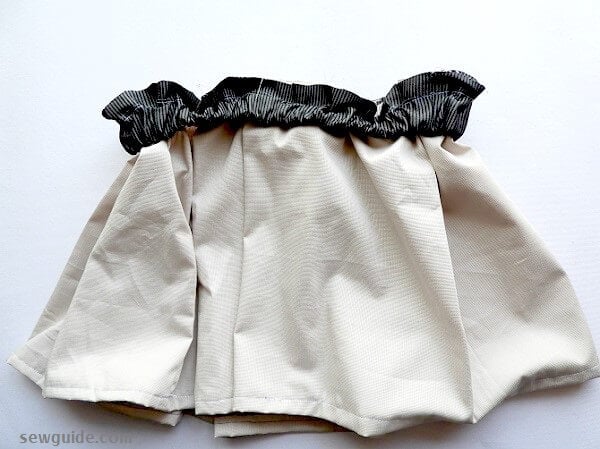
Step 5. Insert elastic in the waistband
Cut out elastic. The measurement I follow is waist round (where I will rest the waistband) minus 1 inch + 1/2 inch for seam allowance, for a snug fit. Try it on your waist for ease. Insert this elastic through the 1″ opening in the waistband.
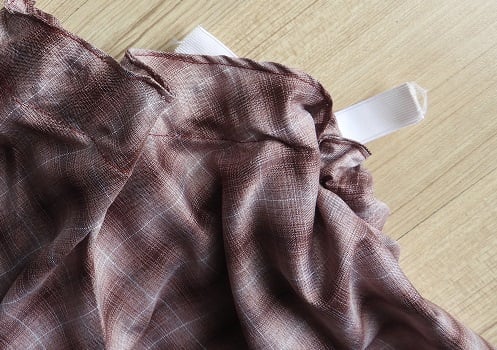
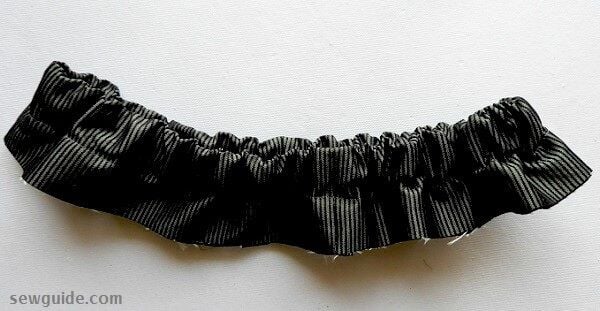
Step 6. Stitch elastic ends together
Stitch them securely together with zig zag stitches (preferably). Several lines of stitching is needed. Straight stitches are also ok. Make sure that elastic has not twisted anywhere. Close the opening after elastic is inserted and secured.
Step 7. Stitch in the ditch elastic to the skirt
Make sure that the gathers are evenly distributed around the waistband. Now Stitch in the ditch between the seam lines at the waist band. This is done for securing the waistband and elastic together, and to prevent gathers coming and bunching up to one side . That is it. Your skirt is ready.
Step 8. Hem the skirt
You may want to hang them for a day or two to correct the hang of the fabric.
Then mark the hem properly and finish. Checkout the different types of machine hems and hand hemming stitches you could use for hemming the skirt. I have simply made a rolled edge with a rolled edge hemmer foot. It has a lettuce edge effect which I love.
Or if you do not like this effect, fold again just the edge and then sew a straight stitch along the very edge.
You can even hand sew this skirt. It may take a little bit more than using a sewing machine ofcourse but the satisfaction of making a garment with your hand is something else.
Checkout the hand stitching techniques and stitches you should know before attempting to hand sew this project. A back stitch is the best stitch for sewing seams.
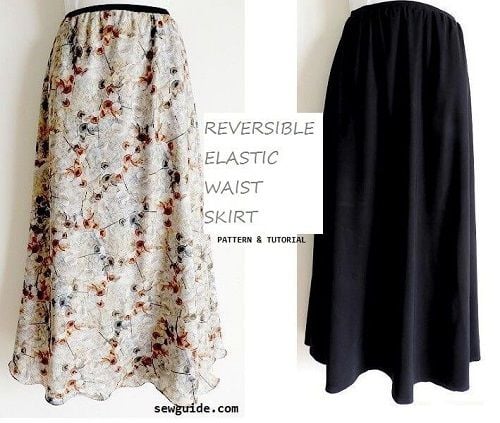
A similar skirt with a lot of flare can be made with an elastic waistband -check out this tutorial for a full reversible skirt with an elastic waistband.
A pattern for pleated elastic waist skirt
This one has a separate waistband and a pleated skirt.
You can change the skirt portion to gathered type but then gathered skirts can look awkward on women because they add to the waist area – so pleating or making tucks works better with the fullness of the skirt
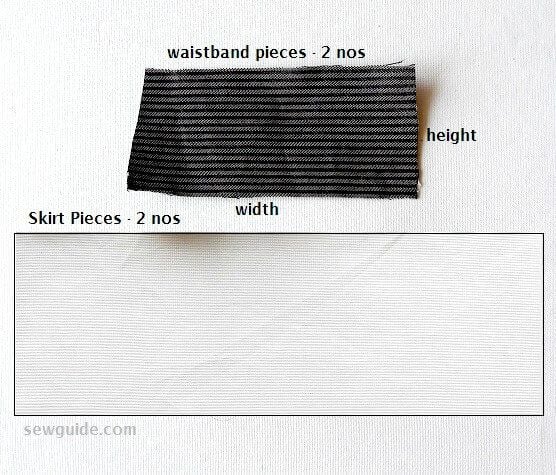
Step 1 Cut out the pattern pieces
2 Waistband pieces
Width = Hip round measure divided by 2 plus 1 inch
Length = 6 inch
2 Skirt pieces
Width = (Hip round measure divided by 2 + 2.5 inches) * 2
Length = SKirt length needed minus the waistband length plus 2 inch seam allowance.
Step 2 Cut out elastic and make waistband
Measure the waist with a 3/4 inch elastic fitting snugly – cut it out. Join the ends to form a tube
Join the 2 waistband pieces at the short edges to form the waistband tube. Fold it by the middle
Insert the elastic band inside the waistband middle.

Stitch the elastic by sewing along the edge, making a casing for the elastic as you sew – you will have to adjust the elastic by pulling it forward as you sew
Step 3 Sew the waistband to the skirt
First join the 2 skirt pieces at the sides to form a tube. You have to pleat the skirt tube to fit the waistband – make the kind of pleats you want or make tucks – the top edge has to be lesser than your waistband – that is the only condition but enough to fit over your hips
Insert the skirt edge inside the waistband rightsides together. Stitch them together.
Related posts : Sewing skirts – easy tutorials.; Sewing circle skirts – free patterns; Circle skirt dimensions – calulate easily
Sorry, but these are horrible instructions. I’ve ruined some gorgeous fabric following this. If my measurement around my arms is 45″ + 10″ divided by 6.28 gives me 9″ if i’m generous. The elastic can’t stretch if there is not enough fabric to stretch! There is no way that is going to fit around my waist let alone get over my head and there are no ‘gathers’ at all. The best I can now do is try to put a zip in to try and save this fabric in a useable form. Very disapointed!
Hi
I am sorry you had a bad experience with the pattern. It worked for me and that too many times. I suppose it depends on the stretch of the fabric as well. It is snug on the waist without much gathers on the waist – but that is a look I want; I do not like the gathered look on the waist. If you make it again you can try it on the body after sewing the side seams and if it doesnot go through, cut a 1/2 inch or so from the top and see if this will change the fit.
How do you measure what the waist band bias material? There is no mention of that in your instructions. I am trying again, but it goes around my waist, at this stage can’t see how I am going to be able to get it on…
You have to measure the top edge and add some seam allowance to get the measure of bias tape. Please do try on the skirt before making the waistband and cut a little at a time till you can get the skirt on you from the top.
TJ,
I had the same issue. I measured around my hips to pull up around them rather than over the head. So 45in + 10/6.28 also gave me ~8.75in. After I cut the piece, it somehow fit perfectly to my waist (30in) but I’m not sure how that’s possible since we both measured to hips/body round??
The only way I could see this working is if this was a full circle skirt rather than half how it appears in the pics. I’m just as confused and spend $70 on some nice fabric and now it’s not working right! UGH
Hi i just got fabric coordinating with my girls dresses but i feel out of my depth. I want a simple dress i got 1 inch no roll elastic and almost 4 yards of fabric. My waist is 50 inches and i want dress about 30 inches long mid calf length. But im getting confused with all the numbers. Please any advise or clarification is greatly appreciated.
Is it tricky to make a waistband that is smooth and flat in the front, but ruched-up and elasticized in the back (where you can hide it under a cardigan)? What would be the correct method of constructing that? Thanks for your time.
Hi Catherine
I have 2 skirts with this waistband here – yoke straight skirt and pleated skirt
Hope you can adjust it to what you have in mind
Hi! I love your skirt and tutorial, thanks for putting it up. I was just wondering how long you cut your bias tape for the waistband?
Please can you send me some free easy patterns to make girls dresses ages 4yrs to 10yrs thankyou.
Thank You Ma.
Hi, I’m a beginner and have a few questions.
1. If I fold the 1.5 yard fabric in half, I don’t get a square, it gives me a rectangle of 44″x27″. What have I missed?
2. AB measurement for me is 9.5″ ( (44+10)/6.28 ). I don’t know how to make that measurement work given my confusion in question 1. It seems to make a very small waist. Have I made my measurements correctly?
I’ve been looking at your instructions, trying to understand, but I just can’t figure it out!
Hi Julia
For a 20 + inch long skirt a fabric of 34-45 inch width and 1.5 yard is fine depending on the top girth. It is all dependant on the length of skirt you want.
You have to get a wider fabric for a longer skirt, the length also likewise. depends on your top girth which you will cut out. Yes the picture is a little misleading – it is not a square – it will be a rectangle
This measurement did work for me – did you measure around your arms? if it seems too small add some extra inches. But it is not too far off. And I think depends on the give of the fabric too.
Where do you get the curve.? In pretty flower skirt. you just skipped that part.
I played with this idea and I made a really cute recycled skirt out of some old curtains that a family member was going to throw away.
That is nice; thanks for commenting
my name is Jill Smith and before I jjoin this club and pay I want to know will I be able to print directons and patterns from your site?
Hi Jill
You don’t have to pay anything : )
Hi great skirt with clear instructions. I have some cotton fabric which is just waiting for this project. In order for the pattern to fit on 45” fabric can you please let me know the length you made your skirt.
Hi, your explanation was simple and you mentioned that there are pics for better understanding. I cannot view the pics.
Hi there. Having a bit of trouble figuring out your pattern for easy elastic skirt. If my shoulder measurement is 54 in plus 10 equals 64in for waist do I divide that in 1/2 when do theI the measurement for A_B
Hi Erika
You divide the measure you get ( by determining the measure around your bust over the arms + 10 inches ) by 6.28. It is basically a half circle skirt which is just a little big enough for an elastic waist . Hope it is clear.
Thank you much clearer now. Will give it a go