The secret is out – I copy my clothes. I dissect the garments I already have and make modifications and sew it as new. Let us see how you can make a pattern from an old garment.
Yes, It is very convenient to make a dress from a ready-made sewing pattern – all the hard work has been done for you by the designer. But some of us have no access to a sewing pattern or you have a favourite ready made dress that you want to copy and make in another fabric/colour/pattern.

How to copy a dress -Make a Sewing Pattern from an old dress you own.
It is very easy to do and gives you a near copy if you know what you are doing. If you are doing it for the first time definitely choose a very simple design. Also ensure that the copy will be made in a similar fabric with a similar stretch, as the old dress.
If you are very new to sewing I hope you will check out the Learn to Sew page for beginners.
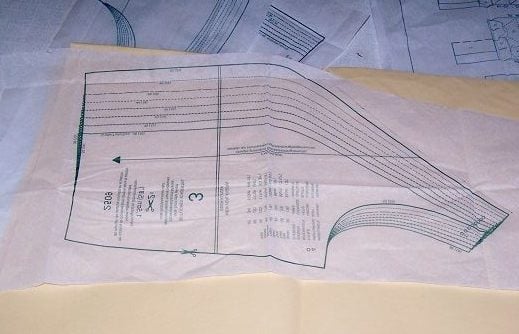
Step 1
Make a paper pattern from the old dress
You will need to have a long sheet of paper ( pattern making paper ) or 2 sheets of newspaper/craft glued along the short edges together to form a long piece.
Get a pencil and a ruler. Checkout this post on reading the tape measure properly.
Make sure that the dress to be copied is ironed without any wrinkles.
Checkout this post on cutting fabric for some details on folding fabric and the correct grainlines of fabric
I usually tape down the corners of the paper to my cutting table surface first, with a paper tape. Then keep the tape measure around my neck ( yes, this is necessary if you are like me and tend to lose the tape measure at the drop of a pin )
Step 2
Turn the dress inside out, flat ; make sure it is not stretched or skewed in any way. The garment should be zipped or fastened. Fold the dress/ top by the center fold line, so that back of the dress is outside ( and front is inside ofcourse) ; Keep the side seams together. Also ensure that dart seams are also matched if any.
Step 3
Keep the center fold line along a long edge of the paper. Make sure that the dress is lying flat on the paper. Hold the corners of the dress with pattern weights . They shouldn’t shift. Now with the pencil ( You can use the tracing wheel if you want to) trace around the dress.
If there are darts in your dress, you have to add the measure of the darts to the pattern measure. Measure the darts correctly. (Measure one side of the dart and double this. You should be adding this much to the pattern.)
Mark the neckline, shoulder point, waistline, hipline, armhole, and sleeve. At all times ensure that the dress is not being stretched or is moved from the center back fold line ( the edge of the paper here).
Step 4
Take off the dress and Make the lines clearer with a sketch pencil.
You may have to add seam allowance, for the neckline (if you are doing binding) and armhole line. 1/4 – 1/2 inch would do. For the side seams no need to add , as the seam allowance will already be there. But if it is a serged seam you may have to add seam allowance here too.
If there is a zipper in the back bodice do not forget to add seam allowance in the back for this.
Step 5
Draft the front pattern the same way as you did the back
If your dress has a center seam or a button down front you may have to add seam allowance here.
If you are using facing to finish the neckline of the front pattern, do not cut out the neckline. Checkout this post on how to use facings to finish the neckline.
Step 6
Trace the sleeves separately from the bodice. You will have to add the hemline allowance of 1.5 inch at the bottom a and a sleeve cap allowance of 1/4 inch
If the dress has collar, you can keep it separately on another piece of paper and trace around. Remember to add seam allowance all around the traced outline. 1/2 inch seam allowance is what I add and then trim to 1/4 inch later.
Step 7
Cut the pattern according to the outline. Mark this pattern on the folded piece of new fabric . Go on and sew the dress.
Here is a nice video which shows some good ideas.