Heat transfer vinyl (HTV) can be used to print designs on your clothing, t-shirts, denim, dresses, whatever. And that is what I did.
Vinyl printing basics
There are two types of vinyl printing – The printing you see as signage and the second one you do on garments.
The signage is printed using special inks in specialized printers. This involves the process of printing designs onto vinyl using an inkjet printer equipped with special inks. There are different options in inks, and selecting the appropriate ink depends on your usage. Water-based latex inks are cheaper but not as durable as solvent inks. You should use solvent-based or eco-solvent inks to print outside banners, etc., as the material will be waterproof/resistant. The designs are printed using big printers that can handle large sizes. They’re printed on things like paper, vinyl banners, wall graphics, and similar materials. But not on fabrics.
For garment printing, you will be using heat transfer vinyl (HTV) sheets that are specifically designed for fabric. You may have heard of them as iron-on vinyl or t-shirt vinyl. They come in lots of colors and textures like glossy, matt, glitter, metallic, holographic, etc. No need for using screen printing or other more complex t shirt printing methods
These special vinyl sheets are cut into shapes that match your designs. You will need a vinyl cutter or craft cutting machine for precise cutting. The vinyl stick to fabrics when you use heat and pressure – adhesive backing on this sheet activates when heat and pressure are applied. This results in a durable and washable design on the fabric.
Starting with the design
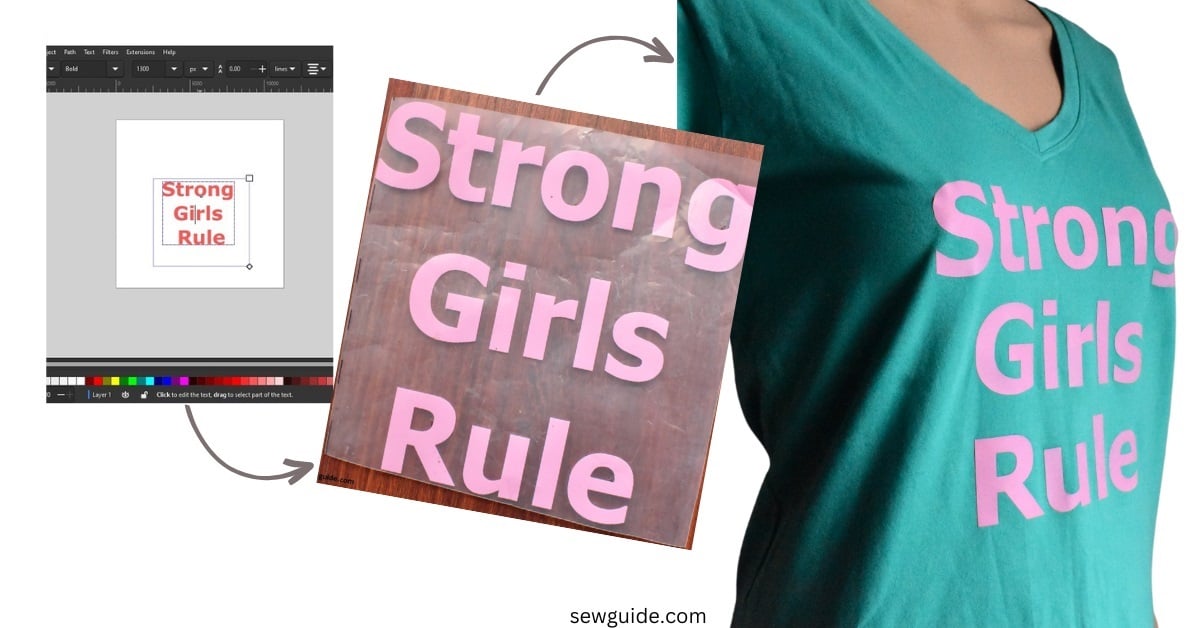
I started off by creating a t shirt design using graphic design software, Inkscape. You can do it in Adobe Illustrator, CorelDRAW, and other more sophisticated software. Alternatively and conveniently, you can, select an appropriate design from free image websites that offer copyright-free designs. This design can include text, shapes, images, or a combination of elements.
The graphic design you’ve created needs to be transformed into a vector format. This vectorization process can be done easily at home using software such as Inkscape or a comparable tool. Or, you can ask your printing company to do it for you. Vectorization involves transforming the design into a format that can be resized without loss of quality.
Cutting the design
The vinyl printing material (HTV sheets) can be brought in shops, and they can be cut in the design of your choice into specific shapes or designs using a cutting machine.
If you are cutting the designs outside at a shop (unless you have a special cutter, you will have to), you can send your customized file in a png format. I suppose they will mirror the design horizontally before cutting it onto the HTV sheet. This is especially important for text and designs with directional elements.
They will be cutting out the vinyl sheet in the shape of your design which leaves only the parts of the design you want to transfer.
If you are cutting it yourself, use a cutting mat to protect your work surface and ensure clean cuts. Use a sharp blade for precise cutting to avoid tearing or fraying of the vinyl.
From the shop, the vinyl design came attached to a carrier sheet of plastic. I trimmed the plastic carrier sheet very close to the design and into seperate segments, so that I would not have difficulty when I peel it off later.
The process of applying heat transfer vinyl using a regular household iron.
So, once you have a design like this, it becomes easy to get that design on your t-shirt. Just keep the design on the t-shirt and press with a hot iron.
But wait! There are some stipulations.
What do you need to do heat trasnfer vinyl printing at home?
Iron (heat setting – cotton setting with no steam).
The garment is preferably made of cotton fibers.
Heat transfer vinyl design (the cutout HTV sheets) Other than single colored you can buy Neon, Flocked, Holographic, reflective, glitter, Puff, and Patterned.
Ordinary white paper or parchment paper for iron protection.
Prepare a flat and hard, but smooth surface as your workspace
Heat resistant tape if you want to pin down the design securely.
- Protect the surface where you are doing the pressing from the heat of the iron. You need an even, flat surface for applying heat with pressure.
- The iron you have should have a flat hard surface. These steam holes on a steam iron will hinder the application of the heat transfer vinyl designs. If you have only the steam iron, ensure that all water is drained out and the holes are not in the middle of the sole plate or all over it.
- I used parchment paper as pressing material because I can see where I am pressing and it is also typically heat-resistant and non-stick. It acts as a good barrier between the iron and the plastic sheet you are pressing


Make sure the fabric is clean and free from wrinkles or moisture. Pre-press the fabric to remove any excess moisture and wrinkles before applying the HTV.
Different HTV types may have specific requirements for heat. Check the manufacturer’s instructions.
If you’re layering multiple colors of HTV, apply each layer separately with appropriate pressing times and temperatures.
A heat press machine gives even heat and pressure. Our household iron doesnot have this even application – so you have to double check and maybe triple check that the vinyl has bonded with the fabric.
Heat up your iron to around a heat you would use for cotton pressing or a little lower.
Alright, let’s move on to applying the vinyl to your shirt.
First, iron out all the wrinkles in the area you are applying the HTV designs. Find out where you will be keeping the design. You can use a measuring tape to keep everything professional or make symmetrical folds as you iron, or just wing it.
Place the vinyl-covered area on top of the shirt, adhesive side down (so the carrier sheet faces up). Use heat-resistant tape to secure the design in place if needed. Make sure it lines up with your guidelines. Place the parchment paper on top.
Apply firm pressure with your hot iron for 10 to 15 seconds, ensuring consistent coverage.
Lift it up. You can probably see through the parchment paper that some missed spots exist.
If some are standing apart, press those areas down for 5 seconds more.
Once you’ve covered the whole design, lift the pressing material up one more time. Ensure that the plastic sheet is not detached from the shirt surface. If it is, you will have to do the adhering part again and again till everything is super clingy (Ensure that in your enthusiasm, you do not melt the plastic)
Some vinyl sheets should necessarily be peeled cold. For some, it does not matter. Mine is the cold peel. So wait till the heat is cooled off, before peeling off the plastic covering.
Remove the carrier sheet from one side slowly.
Your design will reveal itself fixed to the t-shirt, beautiful.
What are the disadvantages of Vinyl printing?
You can use a single color sheet of HTV at a time. If you want to incorporate multiple colors into your design, you will need to cut separate layers of HTV in different colors. These layers can then be applied on top of each other, allowing you to create multi-colored designs. Otherwise only simple designs are possible.
Vinyl printing is also not as durable as screenprinting or sublimation printing. It can wear off in the wash if you are not careful. And you have to be careful not to iron on top of the design.
Which fabrics can be used for heat press vinyl printing?
Cotton is the most popular. You can use 100% cotton. You can also use cotton-polyester blends, quite safely. With Polyester fabrics, you will have to use lower heat settings. Nylon can melt at high temperatures, so very low temperature will have to be used. Another criteria is the texture of the fabric. Smooth fabrics provide a better surface for adhesion.