
What is a Yoke?
“A yoke is a shaped pattern piece which forms part of a garment, usually fitting around the neck and shoulders, or around the hips to provide support for looser parts of the garment, such as a gathered skirt or the body of a shirt” – wikipedia .
I cannot give a better explanation than this to a very important element which adds to the beauty of a garment be it a kid’s dress or a night gown or even at the back of a shirt.
How to make yoke patterns for your clothes
To make patterns of yokes we should first draft a front bodice pattern on paper; the most important marking here is the armhole depth – refer the table to mark this. This is a fitting armhole. If you want a more loose fit add 1/2 – 1 inch to it.

Decide on the neckline of your choice. You can select any of the 60 plus neckline designs given in this post

Simple Round yoke

On A-B mark point 2 such that E-2 = 3/4 inch;
From line G-E mark up 3/4 inch to point 1 on armhole line.
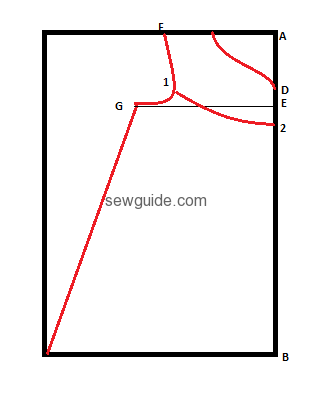
Join the two points 1 & 2 in a soft curved line forming the lower line of the round yoke; cut out the yoke and the lower portion separately.
When you mark this pattern on the cloth do not forget to give 1/4 or 1/2 inch seam allowance.

If you want gathers on the lower part this can be drawn after the paper pattern is cut and separated into the yoke and the lower part
Full round yoke


Add the necessary seam allowance (1/4 inch or 1/2 inch) when cutting from the cloth. If necessary add allowance for gathers in the lower bodice pattern.
Straight yoke

Mark point 1 on the line A-B such that A-1 = 6 or 7 inch
Draw a line straight from point 1 to the armhole 1-2

Cut along the line 1-2 in the paper pattern . Add the necessary seam allowance (1/4 inch or 1/2 inch ) when cutting from the cloth. If necessary add allowance for gathers in the lower bodice pattern.
Square Yoke Pattern
This pattern can be styled in two ways – one starting from the shoulders and the other one starting from the armhole.

Once the paper pattern for the dress is done on paper, mark point 1 such that F-1 = 5 inch ( may take 4 inch for kids)

On the fold line mark a point 2 such that A-2 = 10 inch ( for kids’ dresses 7 inch)
Now mark point 3 such that 2-3 is 3 inch ( for kids 2 inches)
Cut out the yoke pattern ; add seam allowance of 1/4 or 1/2 inch
Square yoke

Add the necessary seam allowance (1/4 inch or 1/2 inch) when cutting from the cloth. If necessary add allowance for gathers in the lower bodice pattern.

Pentagonal yoke pattern
Mark a point 1 on the armhole line 2 inches from line G-E
Mark 2 on line A-B such that A-2 = 10 inches

Add the necessary seam allowance (1/4 inch or 1/2 inch) when cutting from the cloth. If necessary add allowance for gathers in the lower bodice pattern.
Side Yokes
Mark the neck depth as C-D
From D mark 2 1/2 inches to point 2
From point G mark down 4 inches
Draw a curved line touching points G- 2 -C
This is the side yoke line – add 1/4 or 1/2 inch seam allowance when cutting from fabric
This yoke should be cut out and sewn to the rest of the front bodice. Then it is finished the same way that the front bodice is finished
Sewing a Yoke to your bodice is described in the post on sewing a night dress

You can draft the neckline in different styles following the tutorial. Add a placket to the yoke by following this tutorial.
Related posts:


