
Finger-puppets are playthings with endless scope. Kids of different age groups can play with these cute puppets that fit on a finger-or-two, for a long time with different stories and different settings.
They are very good for promoting creativity, especially among young kids. Older kids can make these puppets themselves, modeling their own favourite characters with far more details than I have attempted – the method used is the same and it is very very easy to follow. They make an ideal first sewing project for kids
Related post: Very easy beginner sewing projects.; Different types of felt
You can make these puppets with craft felt – this is the easiest. Craft felt cuts like a dream, sews up easily, both by hand and with a sewing machine and you do not have to think about the edges (no fraying) – so no turning under etc. Straight forward top stitching. And the colours are so vivid. Makes very attractive finger-puppets.
If you do not have craft felt, no issues. Just use fabric scraps in suitable colours or foam sheets. Then you need sewing thread and hand sewing needle if you want to hand sew. Infact hand sewing is best because these puppets are small and you get more control with hand sewing.
Here is a post with easy hand stitches you can use to sew them. Back stitch is what you usually use for hand sewing which looks like sewing machine stitches. You can use stem stitch also.
You also need some embellishments like googly eyes, buttons, ribbons, small felt scraps in red colour for lips, beaks etc. You definitely need craft glue, sharp scissors and a black sharpie marker ( for marking eyes) or fabric paint with a zero number brush. You can also embroider the eyes and other features, so you will need embroidery thread as well, in that case.
For hand stitching felt you need very thin and sharp needles – if they are thin and sharp it is very easy to hand sew with felt.
Basic Finger-Puppet shape
Cut out the felt pieces in the base shape – 2 numbers each for each finger-puppet. The base shape measures 4.5 inches long (11 cm) and 2 to 2.25 inches wide. The length can be even 6 cm for a short puppet.

If you want more originality or customisation you can alter this shape, give it more contours etc.
The two pieces are kept together and stitched along the edge – I hope I do not have to tell you that you will be leaving the bottom part of each puppet open for inserting your digit.
You can use fabric glue to attach details on the face and on the body. Any embroidery has to be done before you attach the two pieces.
Finger-Puppet : Tiger
Cut out the base finger-puppet shapes. Cut out the stripes in a brown fabric/felt and two ear shapes.

Glue them on the top.

Attach the face and mark the eyes and nose shapes.
Use hand sewing needle and thread and sew the edges with a blanket stitch.


Finger-Puppet : Frog
If you do not have felt, you can use some thick fabric pieces to make these puppets. If the fabric you have is not thick use two layers or apply interfacing to the back.
Remember that you need some extra width and length as seam allowance along the edges, when you are using fabric – the method below tells you how it works.
Mark the shape after keeping the fabric pieces rightsides together. Mark the frog shape. Leave 1/4 inch sewing allowance around the marking.Remember to leave 1/4 inch extra at the bottom edge as well.
Work the embroidery or gluing of felt pieces for the lips now.
Cut it out.

Fold the bottom edge to the outside, 1/4 inch for both the fabric pieces.
Sew through the marked lines.
Clip the seam allowance so that when you turn the whole thing inside out, it turns without any bunching up.

Finger-Puppet : Girl

Cut out the face shape and the base pieces for the puppet. And the hair pieces.

Layer them and glue in place.


Mark the eyes with a black pen. Attach the lips.
Layer on the base piece and keep the cloth pieces on top. Sew along the edges.
Finger-Puppet : Boy

Do the same for a boy finger-puppet.

Finger-puppet : Pig

Top stitch the two pieces of the puppet together.
Cut out the face shape. The most distinguishing feature of a pig face is it’s snout. It needs to be cut from a cream coloured fabric/felt. Mark the inside markings with black pen; Attach or mark eyes.
Attach the face on top of the puppet base.
Finger-Puppet : Elephant

To make the elephant puppet, other than the ears and the body, you also need a separate trunk and face pieces and two elephant tusks.

Finger Puppet – Giraffe
For making the giraffe puppet you need two shades of felt – one a light color of beige or orange or yellow and the other a brown shade.

Cut out the antlers,7 or so spots, the snout and the ear- inside pieces from brown felt; cut the body and ears from the light colored felt.
Hand stitching is the best way to sew the edges of the puppets. I have used hand sewn back stitches to sew the edges here.

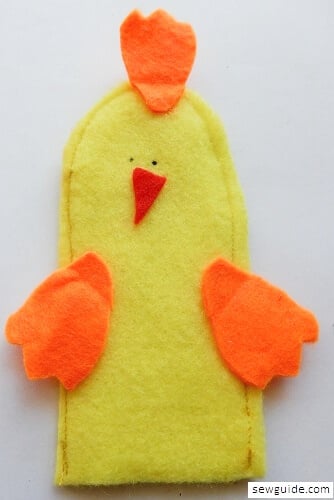
Finger-Puppet : Hen

Finger-Puppet : Lion

A lion only needs two circle pieces on its head, as its mane. Cut one circle bigger than the other. Snip at the edges to create the shape of the mane.
Eyes and nose are marked on the cover.
Cut them out at the center to form a space for its face. Mark the eyes and nose and then finish the edges.
Finger-Puppet : Monkey


My kids, seem fascinated by these puppets, for the time being; A respite from their fascination with the internet.
Related posts : Make Fabric Vegetables ; Make simple fabric games for kids.; Sew a star
Great puppets. Fun to do