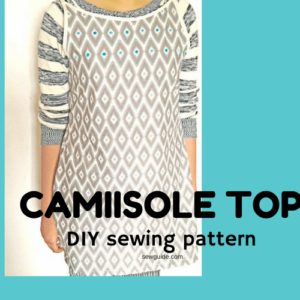
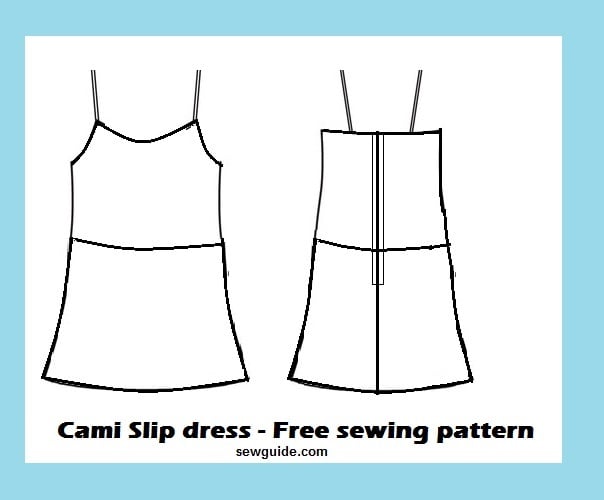
Those living in a hot area needs no introduction to a cami dress ; It is essentially a summer dress. Those living in a more cold area can also do with the cami slip dress. They can simply slip one over a sweater and tights for a layered outfit that will bring style and warmth. So calling a cami dress a wardrobe staple is not a misfit.
This easy to wear dress comes with a flared bias cut Aline skirt and back zipper.The ultimate beauty is that you can make this easily enough. Just follow the step by step tutorial
Choose a beautiful drapable fabric to sew the cami dress or slip dress. It is a free flowing dress and needs a fabric which allows that. You can sew it in a silk or rayon with a drape; Chiffon, Georgette, simple cotton- so many fabric that fit this description.
A heavy weight fabric is not much recommended, though I think a medium weight denim would work. A slip dress made in satin will end up your most favourite night dress of all. Check out the posts on sewing with satin ; sewing with sheer fabric
You can cut the pattern on the straight grain or cut the fabric on the bias grain. I have cut the skirt portion on the bias grain and the bodice on the straight grain, as I think the bias cut skirt will look and fit better. Checkout this post on fabric cutting tips and on cutting fabric on the bias grain
Keep the fabric folded and mark the pattern. Even the ones with a center seam.This way you will get a mirror image. Checkout this post on properly cutting fabric
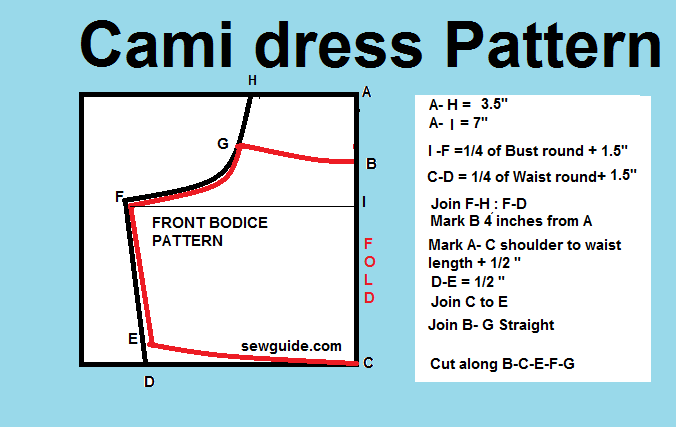
Make a front bodice pattern
You will be making the full bodice and then trim it to the cami size. I have given plenty of ease to this pattern. You can reduce the ease by reducing 1/2 inch from I-F & C-D if you want a fitting one.
A- H = 4 inch
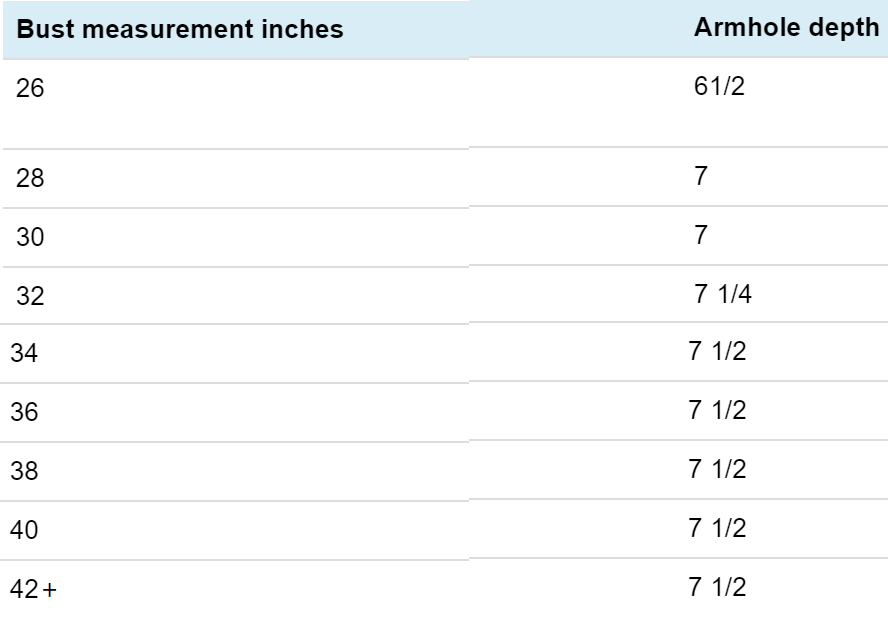
A- F = 7″ ( Checkout the table given below for more accurate measurement for armhole)
I -F =1/4 of Bust round + 1.5″
C-D = 1/4 of Waist round+ 1.5″
Join F-H ; F-D
Mark B 4 inches from A ( This can be made even lower if you prefer a lower or even plunging neckline)
Mark A- C shoulder to waist length + 1/2 “
D-E = 1/2 “
Join C to E
Join B- G Straight or slightly raised
The red line is your pattern ; Cut out whatever is inside B-G-F-E-C-B
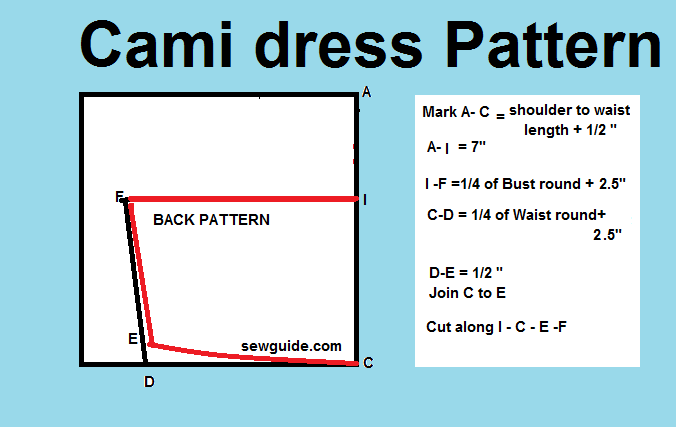
Make a Back bodice pattern
This is going to be cut by the center fold line to join the zipper ; hence it is made slightly wider by 1 inch along the center fold line
A- H = 5 inch
A- F = 7″
I -F =1/4 of Bust round + 2.5″
C-D = 1/4 of Waist round+ 2.5″
Join F-H ; F-D
Mark A- C shoulder to waist length + 1/2 “
D-E = 1/2 “
Join C to E
Cut along I- C -E-F ; Now cut it by the centre fold line

Make the skirts
Front skirt is one piece and the back skirt has two fabric pieces, just like the bodice
Fold the fabric by half. Mark the measurements and cut
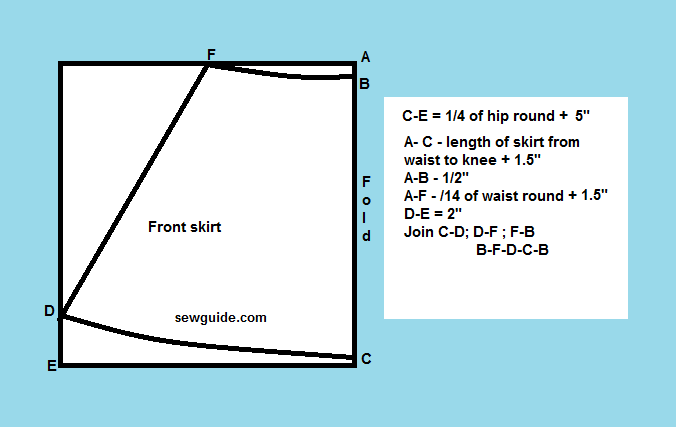
Front skirt
A- C – length of skirt from waist to knee ( or whatever length you want) + 1.5″
C- E -Flare of the skirt – 1/4 of hip round + 5 inches
A-B – 1/2″
A-F – /14 of waist round + 1.5″
D-E = 2″
Join C-D; D-F ; F-B
Cut along B-F-D-C-B; Open up the fabric for the full one piece front skirt piece.
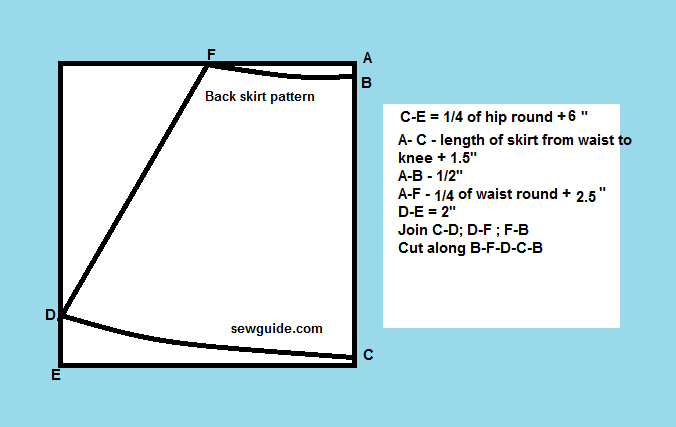
Back skirt
A- C – length of skirt from waist to knee + 1.5″
A-B – 1/2″
A-F – 1/4 of waist round + 2.5″
D-E = 2″
Join C-D; D-F ; F-B
Cut along B-F-D-C-B
Cut along the center fold line of the back skirt piece
Now you have 6 fabric pieces
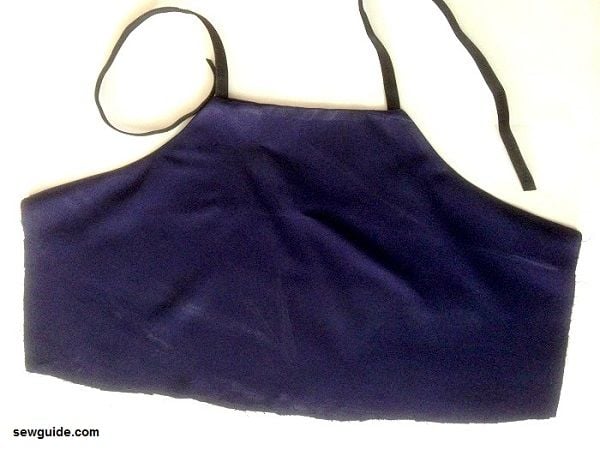
Straps -I am using black elastic as the strap. You can use bias strips sewn as spaghetti straps as straps here. You also need 2 bias binding strips of 10 inches long and 1.5 inches wide; Checkout the armhole length table given at the end of this post for exact measurement of the strap. Double the armhole length for your bust round and subtract the measurement from G to the line F-I on the front bodice pattern. Add 1 inch extra for fabric edges.
Get the 10 inch long bias tape ( make bias tape with the tutorial here from the same fabric of the dress) Make spaghetti straps. Checkout this tutorial to make a thin fabric tube which can be used as spaghetti strap.
Facing pieces – Make a copy of the top edge of the front bodice for making a facing piece, including the armhole line . The facing piece should be atleast 2 inches wide. The back bodice facing pieces are long rectangles of 3 inch width and length equal to the top bodice edge + 1/2 inch.
Steps to sewing the cami slip dress
Step 1
Finish the top edge of the front bodice with the facing piece.Keep the strap sandwiched in between the bodice and facing ( right sides together) so that when the stitching is done the fabric edge of the strap will be neatly encased inside.
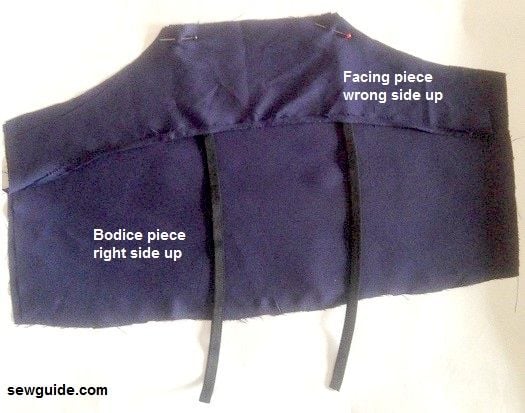
When you turn the facing to the wrong side it will look like this
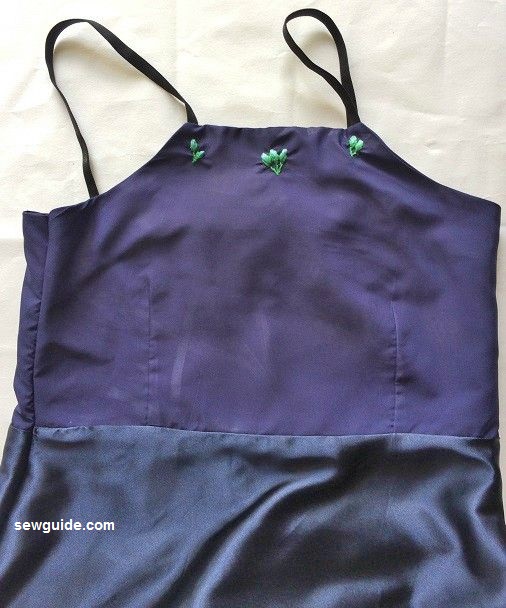
I decided to make some small embroidered flowers on the bodice. This bud is made with simple granitos stitch.
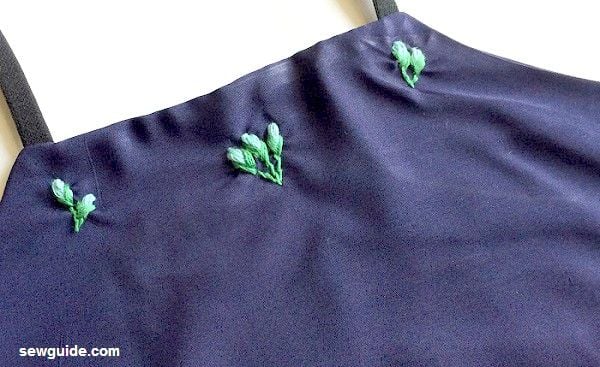
I gave two small darts near the waist in the bodice. You can totally skip this part. For the darts you will have to add 1 inch extra in the waist portion of the bodice of the front at the pattern cutting stage.
Step 2
Join the front bodice to the skirt
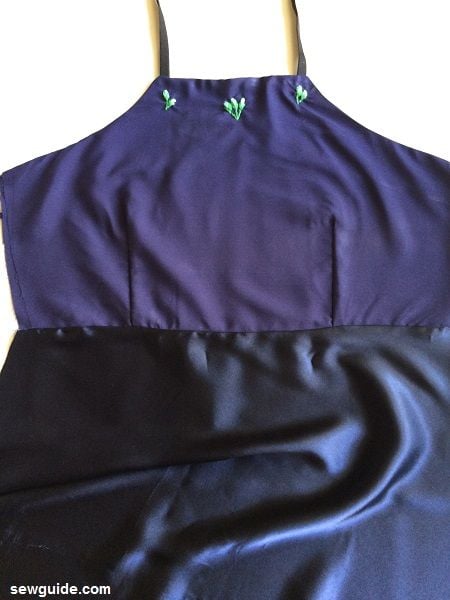
Join the back bodice pieces to the back skirt pieces at the waist. You will have two left and right bodice pieces now.
Step 3
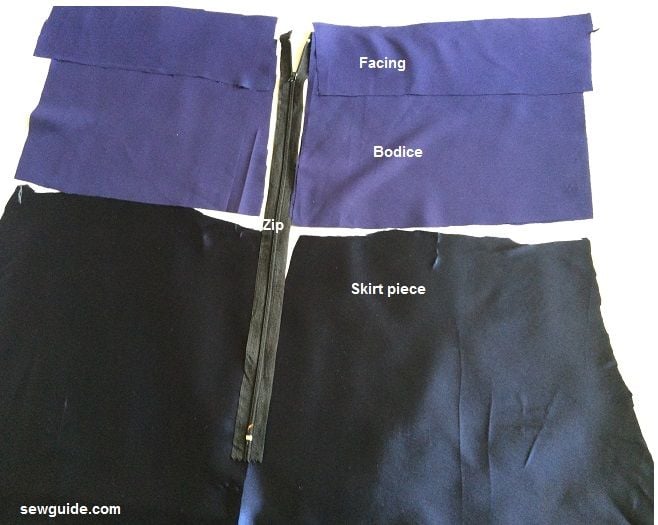
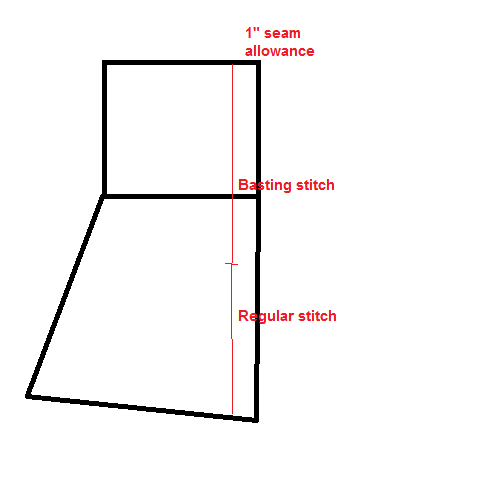
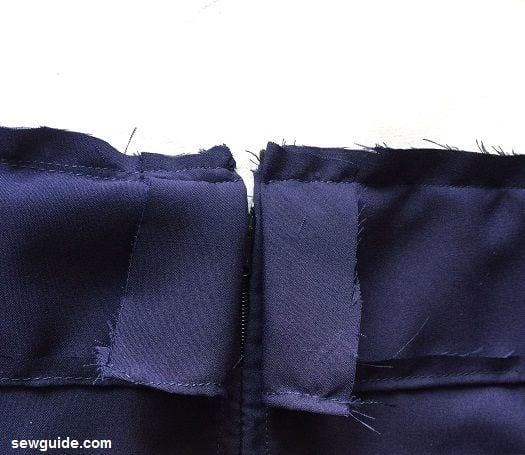
Zipper seam -Keep the back pieces right sides together. pin along the center seam.Check the length of the zipper. Mark. Stitch this area with a basting stitch ( with a long stitch length) .Join the rest of the seam with a regular stitch length.
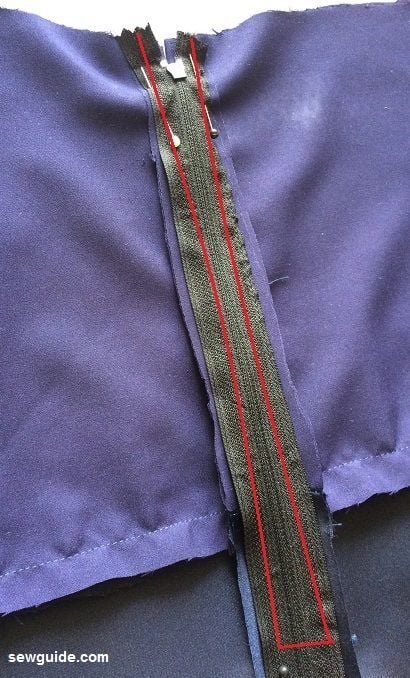
Put on the zipper foot on your machine. Keep the zipper face down on the back of the bodice seam. align the zipper opening perfectly with the center seam. Pin in place.
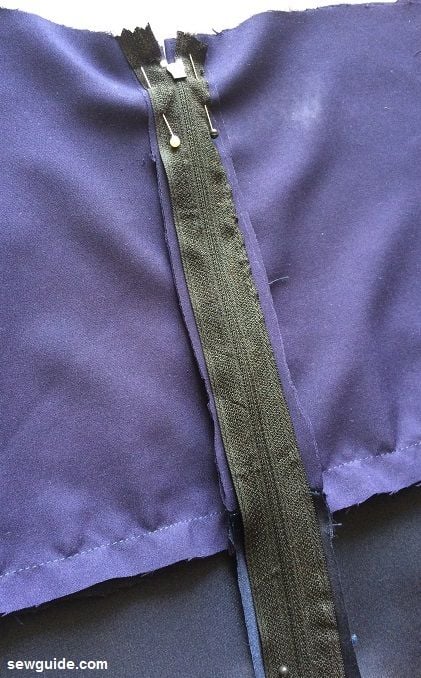
Stitch along the two sides of the zipper . checkout this post on zipper application for more details.
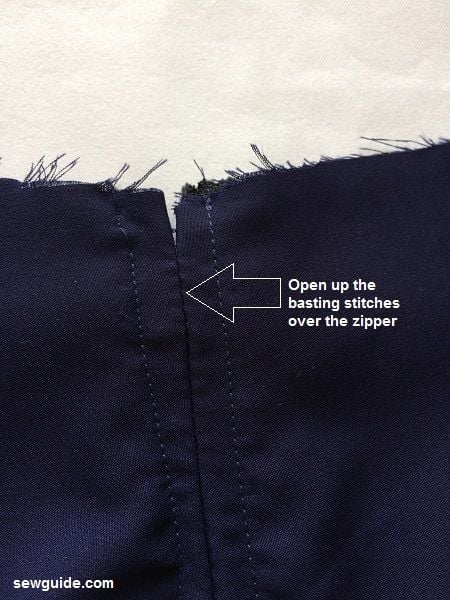
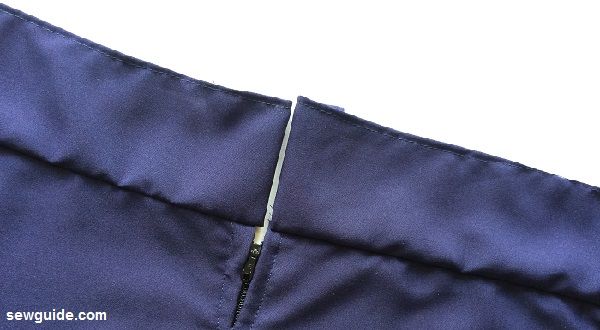
Once the zipper is stitched, remove the basting stitches with a seam ripper.
Step 4
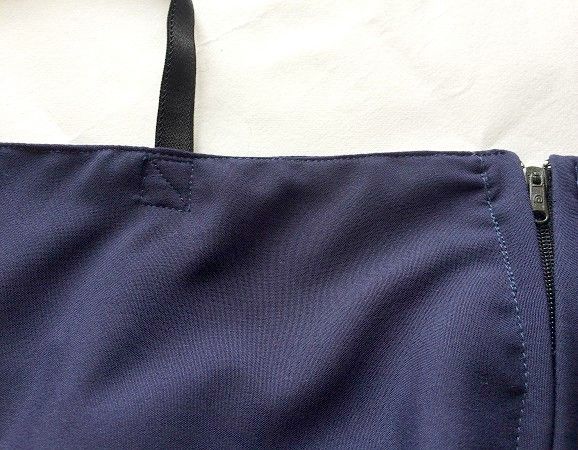
The facing pieces for the back bodice are rectangles which match the top edges and are about 2 inch wide. Remember to fold the edge near the zipper opening inside and pin in place before sewing the top edge and facing and the other end of the strap together along the top edge
Top stitch the edge in place. You can also handstitch the facing to the back.
If these steps are not clear checkout the tutorial to make a slip which has the same thing explained.
Step 5
Join the other side of the strap to the back bodice. Fold the back edge by half and mark strap placement and stitch in place.
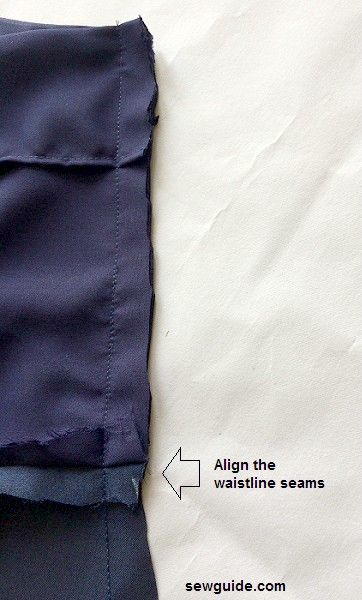
Sew the side seams. Make sure that the waist seams match.
Step 6
Finish the hem of the skirt. It is preferred that you hang the skirt for a day or overnight before hemming. I have done a narrow hem.
Related posts