Ribbon embroidery work is so exquisite that I fell in love instantly – my excuse is, anyone would, when they see this work.
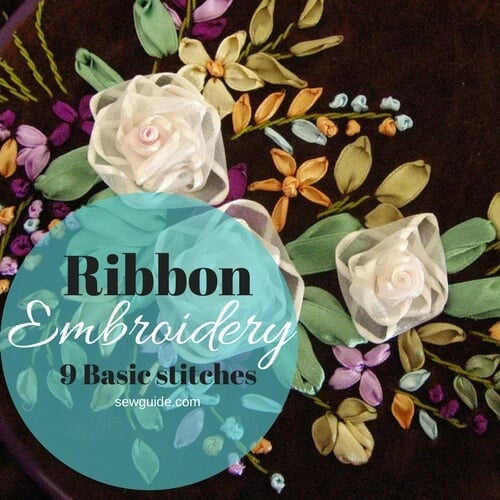
This embroidery technique started somewhere around the 16th century in Europe and obviously caught the favor of the ladies in waiting in the french court who used this work to embellish their elaborate gowns. You can imagine the splendor that this stunning work brought to their beautiful ball gowns, hats, bags, gloves, and parasols.
English ladies took it up and made it their own. Later the interest in this work waned but now it is getting more appreciated for its intricate and stunning designs.
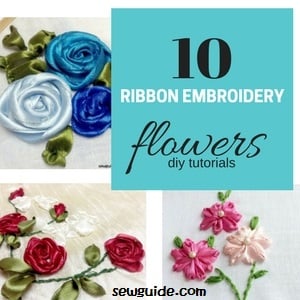
Once you have mastered the basic stitches you can go about creating the beautiful ribbon embroidered flowers. Also checkout the 15 different types of ribbons available for you tostart working.
 .
.
- What supplies do you need for Ribbon embroidery
- How to thread the needle with the ribbon.
- Knot or not ?
- Basic stitches used for ribbon embroidery
- 1. Straight Stitch
- 2. Stem stitch
- 3. Whipped stem stitch
- 4. Ribbon stitch
- 5. Loop stitch
- 6. Lazy Daisy Stitch
- 7. French Knot
- 8. Couching stitch
- 9 Feather stitch
- How to take care of ribbon embroidery projects
In this work, the ribbon is used instead of embroidery floss and it is stitched on either transferred designs or stamped designs and worked along with embroidery floss work and embellished with beads, etc.
This complicated-looking (deceptively so) work is in fact quite simple and easy to do and can be used to embellish anything – clothes, accessories, and home furnishings-pillow-cases, bedspreads, and quilts, bed skirts, aprons, doilies, table runners.
The advantage of ribbon embroidery is that you can cover a lot of areas with simple stitches in far less time and effort than you would with embroidery floss but with greater impact and effect. You can cover a large area with a little amount of ribbon using simple stitches you already know. So the work turns out to be inexpensive as well.
But the disadvantage is that the ribbon is delicate, so clothes embellished with ribbon embroidery have to be handled / maintained with utmost care but they are stunning on accessories where washing is not an issue.
What supplies do you need for Ribbon embroidery
- Needle
Chenille needle with a large eye and sharp point is what you need – You need the eye big enough for the ribbon to pass through it without any damage or wrinkles. The chenille needle is a big needle with sharp tips which will easily penetrate thick fabrics. A size 18 needle is sufficient for 4 mm ribbon
You can use Tapestry embroidery needle as well , especially when you are doing ribbon embroidery on loosely woven fabrics; It has a blunt end which is great for making weaving stitches.
- Ribbons in assorted colours
Ribbons are available in just about any colors possible – in synthetic materials as well as silk. Silk ribbons look exquisite but are quite expensive; they are very soft to the touch and can be easily molded. Good quality satin ribbon can also be worked into exquisite intricate works of art. There is some rayon ribbon which almost looks like silk ribbon.
Satin ribbon is the best for beginner – the first time you make these stitches you are going to rip a lot of the ribbons apart – better the inexpensive satin ribbon than silk.
Make sure that you buy quality ribbon which is soft and pliable and which do not crease too much.
Edge Dyed Silk Ribbon, variegated silk ribbon, ombre ribbon, sheer ribbon, shimmery ribbon are varieties of ribbons which give a different effect to your work .
Usually used widths are 2mm(1/16″), 4mm(1/8″) , and 7mm(1/4″) ( 4mm is the most used )- cut to 10 inch – 14 inch long pieces.2 mm (1/16″) ribbons are good for making french knots, daisy petals, leaves etc
Check out the post on the different types of ribbons available – as many as 15 types!
- Embroidery hoop
- Fabric
You can use any fabric for doing this embroidery. If you find that the needle and the ribbon is not going through the fabric make small holes with a sharp needle/ awl.
If you have very thin fabric or very stretchy material you can interface the back of the fabric with an interfacing for some stability and strength
- Design
- Marking tools
Vanishing fabric marker or any other transfer supplies. Checkout this post on transferring embroidery designs for more details.
Optional supplies
- Trolley needle – This blunt needle is worn on the finger and used for laying the ribbon.
- Embroidery needle and floss – if you are making other embroidery stitches with floss like the stem stitch, french knots etc.
- Beads, sequins, buttons etc for embellishing the finished work.
- Iron-on designs – these are preprinted designs which you can use to work the ribbon embroidery on.
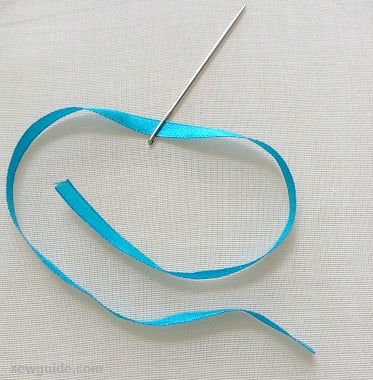
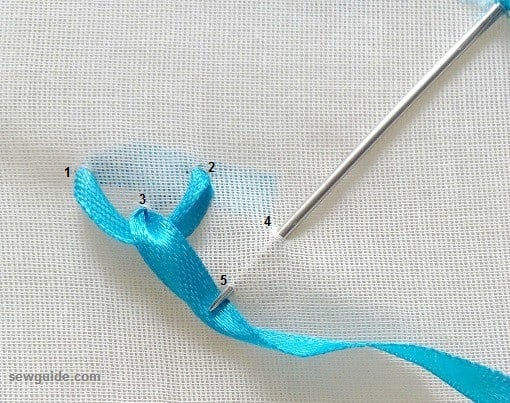
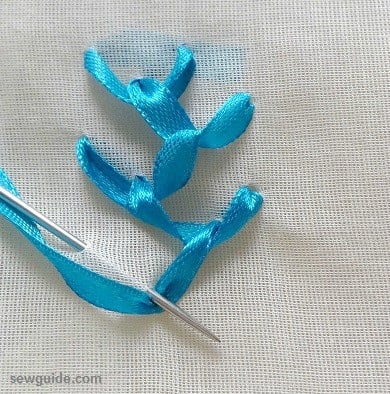
How to thread the needle with the ribbon.
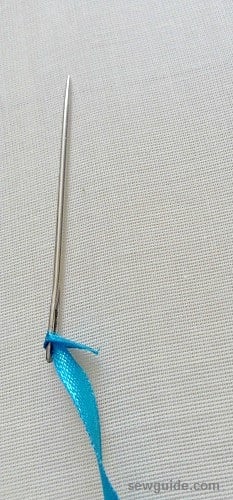
Step 1
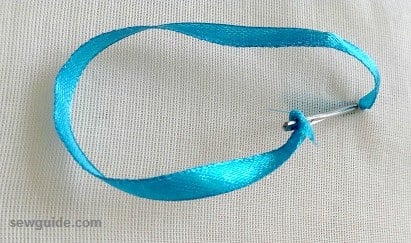
Cut about 12 – 16 inch length of ribbon; Cut end at a 45 degree angle for easy threading. Thread the ribbon through the needle eye
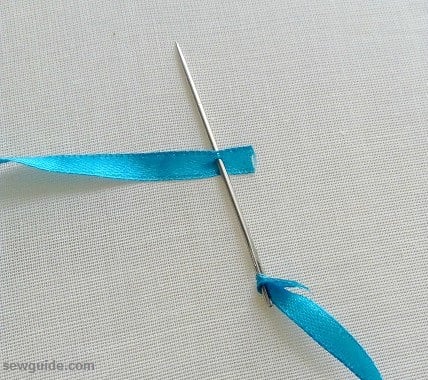
Step 2
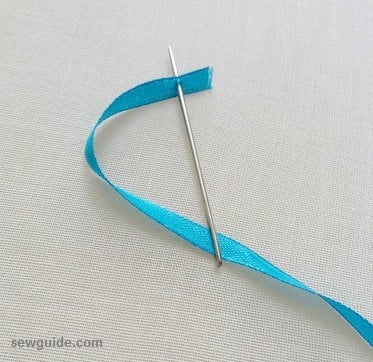
Now pierce the needle through one end of the ribbon 1/2 inch from the edge. Take out the needle all the way through the ribbon hole, till you make a loop at the eye of the needle.
Start stitching
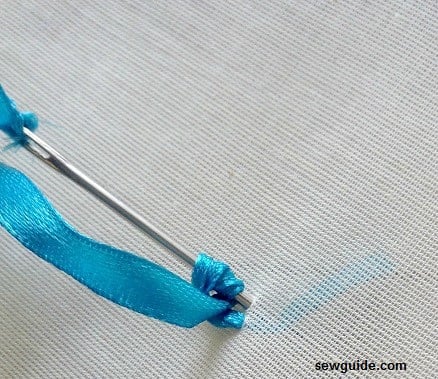
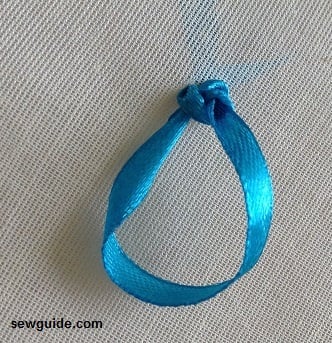
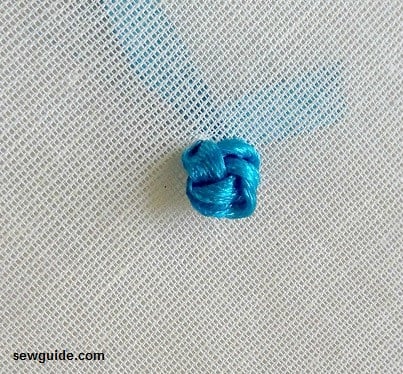
Knot or not ?
You can knot the end of the ribbon like this by going through the end edge of the ribbon
The knot will look like this
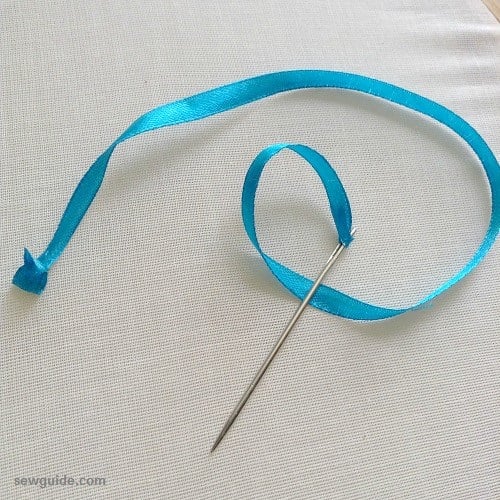
or Leave a long tail when starting at the back of the fabric. Knotting will create unnecessary bulk and ugliness at the back so to avoid this you can do this. when making the next stitch ensure that this long tail is kept in the back of the stitch ; this will anchor the ribbon without the knotting
Basic stitches used for ribbon embroidery
The best part of ribbon embroidery is that it uses some of the basic embroidery stitches that you use for doing needle work – nothing more. The only difference is to make the stitches loose and fluffy.
Some common stitches used in ribbon embroidery work
1. Straight Stitch
As the name suggests a straight stitch is worked with the ribbon.
2. Stem stitch
This is used as an outlining stitch. Make a straight stitch, then come up between the two points of the stitch. Make another straight stitch and continue in this way ;Ensure that you have even stitches of equal length.
3. Whipped stem stitch
Make a stem stitch first with embroidery floss.
Whip needle threaded with ribbon through the stem stitches – the same way that the hand embroidery stitch, whipped stem stitch, a variation of stem stitch is done.
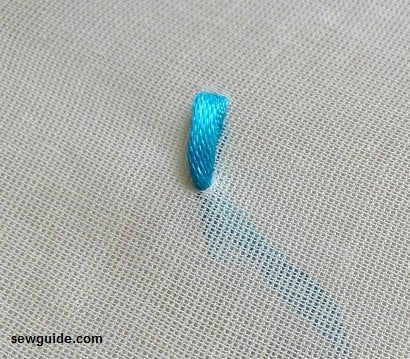
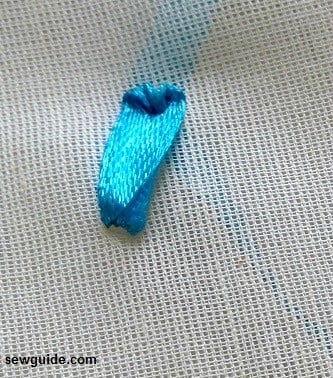
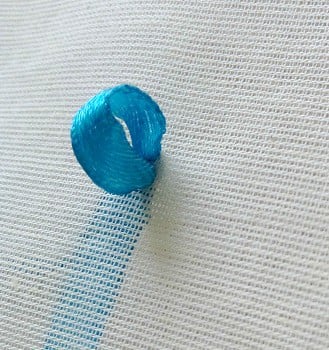
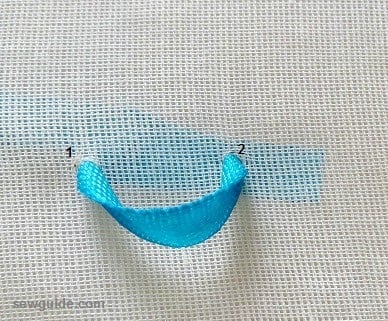
4. Ribbon stitch
Bring up the needle ( at point 1) from back to the front of the fabric.
Keep the ribbon flat and pierce the ribbon some 1/2 inch above ( or as much as you want the length of stitch to be – at point 2) to the back of the fabric.
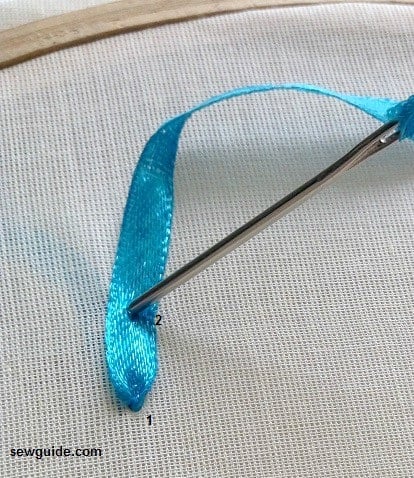
Bring down the needle and pull so that the ribbon curls to itself at the top of the stitch. it will resemble a petal.
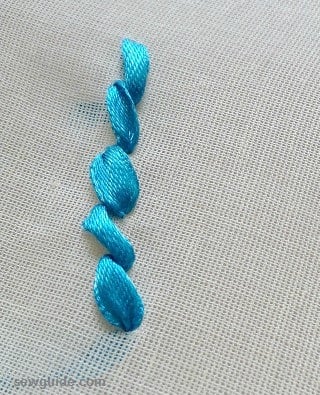
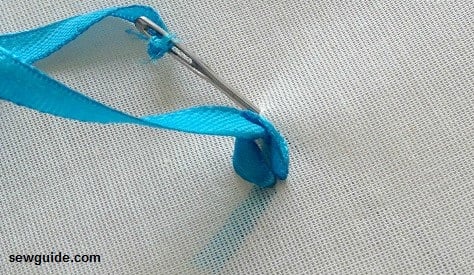
5. Loop stitch
Small loops are formed by the curl of ribbon in this stitch. This stitch can be made to fill a design or make petals.
Bring up the needle to the front of the fabric. Keep a needle or pin to hold the loop as you make it. Now bring down the needle some 3 threads up from the first point . Make similar loops. Be aware that these loops are flimsy and weak.
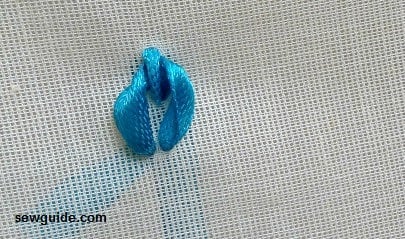
6. Lazy Daisy Stitch
This is a variation of the loop stitch with the loop held with a small straight stitch on the loop. Check out the original embroidery lazy daisy stitch and the different flowers you can stitch with it.
Bring up the needle and make a loop. Now make a small stitch across the top of the loop to anchor the loop there, the same way you make lazy daisy stitch with embroidery thread.
7. French Knot
This is made the same way that you make french knots with embroidery floss. You can also check out the tutorial to make french knots here
8. Couching stitch
This is a very easy stitch to outline a design. First lay the ribbon in the desired direction. Use embroidery floss or small ribbon to couch the ribbon at desired even intervals.Checkout the post on couching for more details
9 Feather stitch
This stitch is done the same way that the ordinary feather stitch is done.
How to take care of ribbon embroidery projects
As said, ribbon is delicate – so handle with care. You will have to hand wash any project which has ribbon embroidery work. Do not wring. Lay flat to dry. Do not iron from the face obviously. You will have to press from the back of the work. Use gentle pressure only. Checkout the post on caring for delicate clothes for more details. Spray the embroidery with water slightly to perk them up.
Related posts
Hi, I’m having a difficult time finding an answer for this, I am certain that you will know the answer. I am doing a standard ribbon embroidery piece…however, my design has a patch of satin on top of my ground that I want to hold in place with an iron on adhesive. But, as this is for someone else, and made sense to me at the time, I am concerned about getting the ribbon through the patch. Have you any ideas for me? It’s a fairly extensive and detailed piece, I sincerely look forward to your advice. Thank you in advance.
Is it the difficulty in going through the patch that is bothering you? Have you thought about using a sewing awl for this – the kind used to make small holes to ease passing of needles when sewing thick fabrics like leather – leather sewing supplies
Help! I’ve just completed two decorative pillow covers stitched with silk ribbon embroidery. I feel I should protect the back of the stitched side as it looks messy and am not certain that the stitches are secure enough.. Will a light Pellon fusible backing ruin the looped ribbon stitches? Any recommendations would be appreciated.
I’m embroidering a jean jacket for my sister with some sunflowers, and was looking for something large enough to do the stems that won’t look too thin or be a pain,
Would ribbon embroidery work for that do you think I’m just worried about how delicate it is
I started a rectangular ribbon embroidery project and realized the only way to finish it is to put the hoop over some of my finished work. Will it ruin it? Any suggestions for moving the hoop to complete the project? Thanks
Hi
Hooping can sometimes ruin the ribbon embroidery especially if flimsy satin ribbon is used. You can just fluff it back, most of the time.
One way out is to float the material ie use a backing (the backing is hooped) and attach this backing to the fabric with temperory adhesives – the way sometimes machine embroidery is done.
Love it! I have been thinking about doing ribbon embroidery for a while, but didn’t know exactly how to start. Thank you for the information.
Thanks for the knowledge
I’m looking to purchase some of the silk ribbon for hand embroidery. I’m going to be retiring or going to part time, will have more time for projects! I have work with this type of embroidery in the past! Just wondering if anyone knows where I can purchase the silk ribbon for hand embroidery, in the Midwest (Iowa) area. I’m the type of person that would like to see the colors in person!
Kathy
You find them at michael’s, hobby lobby and some walmarts carry as well
Check out Threadart website. I just received the jewel tone grouping of 4 know Silk ribbon today from them. It’s gorgeous.
Can you use soluble Aida?
I have realised that most all ribbon embroidery work that youve probably spent ages doing would easily fall apart if you embroidered, then dissolved the soluble aida cloth that youve stitched it onto, so I would not reccomend it myself personally. I have seen others cut around the outer edge of their ribbon or embroidery, work then they hand stitch or sew it onto other fabric or clothes, ect. I wasnt game to try it myself as yet. It might work if you find tutorials on Youtube or you can download thousands of whole ribbon embroidery books for free off pdfdrive.com that teach you how make or sew ribbon and embroidery flowers or stitched artwork seperately, without any cloth and it doesnt fall apart then, then you could hand stitch that on to cloth or soluble fabric, then dissolve it. But then I think, why pay for cloth and stitch it on if u are just going to dissolve it. Good luck and ope that helps anyway. : )
Thank you for such detailed explanations and careful instructions. I have done embroidery for many years and want to try this for my next quilt. Your photos make it so much easier to follow as well.
Hi Joan
Thanks for taking the time to comment- glad you found it helpful
Really nice website. Found it while looking for ribbon embroidery.
Thanks for sharing. Would also like to get some more tips on how to go about this
thank you
Have to checked this post – https://sewguide.com/ribbon-embroidery-flowers/
Hello, stumbled on this website, and oh my just loved it. Looked at much of the instructions. Thanks for your talent to share with others.
🙂 thank you so much for the sweet comment