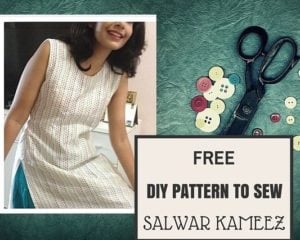
 SEW SIMPLE PANTS FOR YOUR TUNICS/ SALWAR KAMEEZ
- SEW SIMPLE PANTS FOR YOUR TUNICS/ SALWAR KAMEEZ
- Cloth needed for different pants
- Plain Salwar pattern cutting and stitching
- Measurement to be taken for stitching a salwar
- How to stitch the salwar bottom
- Patiala Salwar pants (Semi and Full) – Pattern cutting and stitching
- Side embroidered Salwar pants- Pattern cutting and stitching
- Dhothi pants – Pattern cutting and stitching
- Churidhar Pants pattern cutting and stitching
- Easy Parallel pants/ Palazzo pattern cutting and stitching
So you want to sew your salwar kameez pants.
You may want to wear it with your favorite kurta or tunic.
Or the store-bought one needs to be better.
Or you want to sew one for your darling daughter.
Whatever the reason, if you are apprehensive about sewing salwar pants for the first time, let me assure you the first time you sew a pant is the hardest. The next time you sew it, it is a breeze once you have the pattern with you.
In this tutorial, I will give you all the details about preparing the pattern and stitching of plain Salwar pants and their variations like Patiala, Dhoti pants, and Parallel bottoms.
Suppose you are planning to stitch the pants many times. In that case, you can make paper stitching patterns by creating the markings on paper (I usually join two full sheets of newspaper or craft paper to form a big piece) rather than on the cloth itself and keep it somewhere safe to use again and again.
Stitching with this pattern drawn on paper will save you a lot of time that you will spend in the time-consuming pattern drawing and calculating, and it will leave you free to enjoy the pleasure of sewing.
When you go to the shop to buy cloth to stitch the salwar separately, other than as a salwar kameez set, remember to take your body measurement, to know the correct yardage to buy. Measure the waist ( or wherever you tie the salwar ) to the floor, then double the measurement to know how much cloth you should buy for your plain salwar. I.e., if the full-length height is 110 cm, you should buy 210 cm (2.10 meters) of fabric.
Cloth needed for different pants
- Plain salwar – Double the length needed.
- Churidhar – Double the length needed plus 1/4 meter if you want more churis.
- Patiala – Double the length needed plus 1/2 meter (44 inches wide cloth), for a Patiala with some gathers. If you want a real Patiala with lots of gathers, you need about 4 meters of cloth. With 3.5 meters, you get decent enough folds.
- Parallel -Double the length needed plus 1/4 meter extra.
Checkout the posts on How to take body measurements for more details.
Plain Salwar pattern cutting and stitching
There are 4 pieces to the Plain salwar pattern
1. Waist piece
2. Pant piece
3. Canvas piece
4. Tie piece
Measurement to be taken for stitching a salwar
Full length – From where you tie the salwar to your heels.
Hip round – take the measurement around the hip loosely
Pant flair round – take the measurement around the ankle loosely. This is usually taken as 12 -14 ” . (I usually take 13″. Seam allowance is extra.
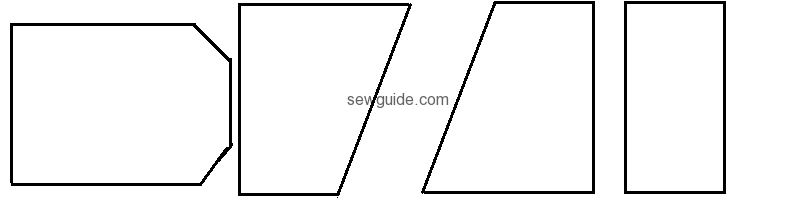
Pant Piece ( we will be cutting 2 pieces like this on fold ) Checkout How to cut fabric to know more details on how to fold fabric for cutting.
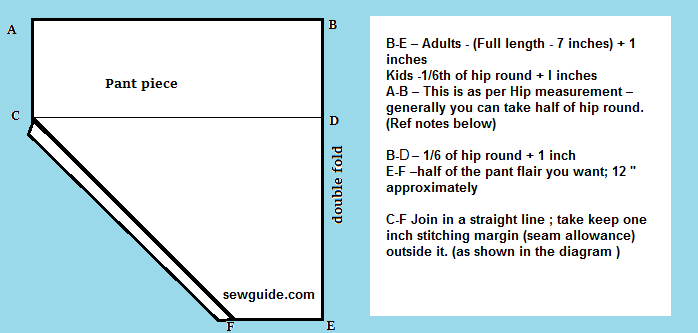
B-E – Adults – (Full length – 7 inches) + 1 inches ( 7 inches is taken for the belt of salwar)
Kids -1/6th of hip round + I inches
A-B – This is as per Hip measurement – generally you can take half of hip round.
If you are particular you can mark as per the measurement below
For below 34 inches half of hip round
For 34 inches to 42 inches – 18 inches
For above 42 inches – 20-22 inches
B-D – 1/6 of hip round + 1 inch
E-F –half of the pant flair you want; 12 inches is usually taken.
C-F Join in a straight line ; take keep one inch stitching margin (seam allowance) outside it. (as shown in the diagram )
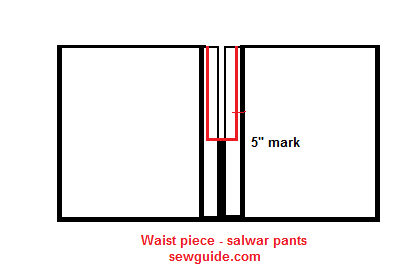
Waist piece ( 1 piece cut on fold)
A-B = E-F – Half of hip round + 3.5 – 5 inches
A-E /B-F= For adults – 10 inches / For Kids – (1/6 of hip round) +1 inches
Mark A –C / B-D – 3 inches for folding inside for the tie to be inserted
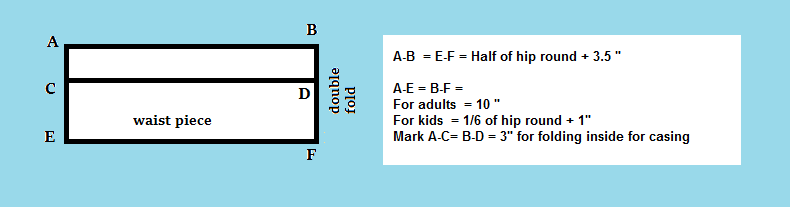
When marking on fabric, make sure it is placed on a folded cloth, and B-F is along the fold. Open the full waist piece, divide it into four parts, and make a small mark with your marking tool/chalk – this is for accurately joining it to the pant piece.
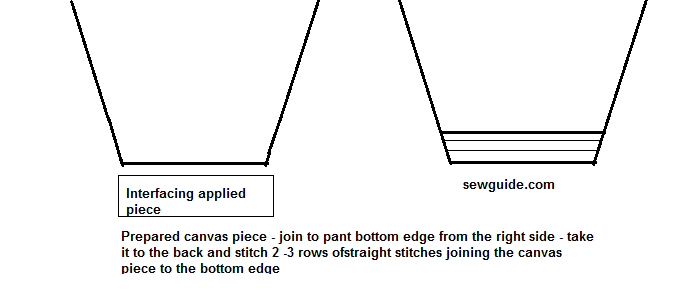
Canvas piece
A strip of canvas piece or 2 inches * the Pant flair measurement
A cloth piece which is 2½ inches * the pant flair measurement
Tie Piece (Fabric straps)
Checkout the tutorial to make thin fabric tubes.
Take a strip of cloth 3 times hip round and 2 inches wide. If you have bias strip that would be ideal. Make a tie with this strip. Another way is to take your waist measurement and add 20 inches as overhang.
When cutting the cloth, you have to remember to mark the pant pieces first and cut. This is because, at times (when you are getting the ready-made material of the salwar kameez), the cloth may not be sufficient; in that case, we will have to make some adjustments and get the piece for the waist piece from along the side C-F of the pant piece.
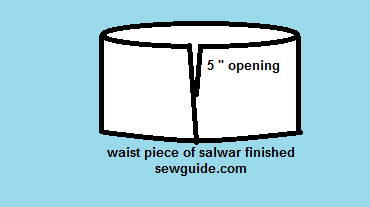
How to stitch the salwar bottom
For more step-by-step instructions, check out “ Salwar pants stitching instructions“

STEP 1
Join the waist piece by A – E making a tube – leaving 5 inches opening for slit.
STEP 2
Stitch along the side of the slit opening as shown in the diagram: Edge stitch along the folded seam allowance from inside
Fold the Waist piece on top by 2 ½ inches on top edge for a case for the ties. You have to stitch enclosing the raw edges .
STEP 3
Stitching the bottom edge of the salwar
Iron the canvas piece, leaving half an inch along the long side of the cloth piece.
Stitch this, keeping it to the Right side (Right sides together) of the pant piece so that when turned inside the canvas cannot be seen.
Fold the cloth inside so that the whole canvas is enclosed. Join this to the pant bottom edge by keeping the canvas piece and pant piece right sides together.
Then you can stitch some 2-3 rows of straight stitches parallel to the hem.
STEP 4
Join the pant pieces one by one along the C –F. Then Join the two pant piece parts along the cutting at the crotch.
STEP 5
Now mark the midpoint of the waist piece. Join it from the back to the front side along one side. Stop at the side. Then likewise join from the other side till the front side.
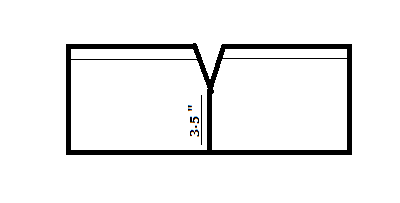
STEP 6
From the front, stitch 4-5 inches to the side without pleats and then make small gathers till you reach the place where you had earlier stopped. Do the same with the other side.
STEP 7
Finally make the ties and insert inside the casing with a safety pin.
STEP 8
Iron to a good finish and enjoy your new salwar.

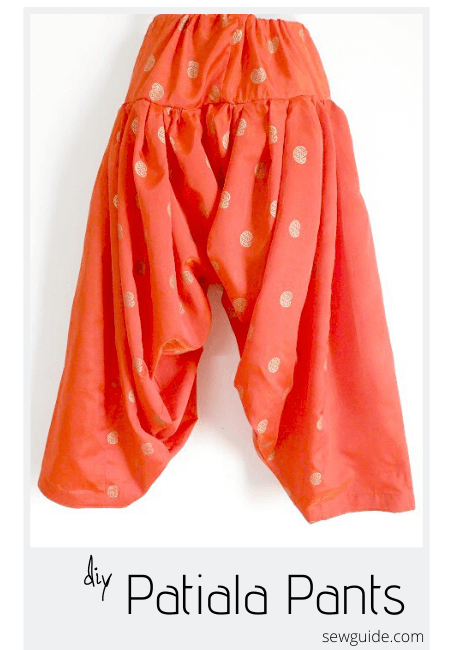
Patiala Salwar pants (Semi and Full) – Pattern cutting and stitching
Patiala is a plain salwar with more pleats. The difference between full Patiala and semi Patiala salwar is that Full Patiala has more pleats than a Semi Patiala.
If the cloth is not sufficient to give as much flair as you want, you will have to make do with joining two pieces of cloth to the middle pant piece to get more flares ( as shown in the diagram )
Patiala is best if stitched in synthetic materials. If we use cotton fabric to stitch the Patiala, it will look bulky. The fabric required is 2.5 times the full length.
If the cloth is not sufficient to give as much flair as you want you will have to make do with joining two pieces of cloth to the middle pant piece to get more flares ( as shown in the diagram ).
In Patiala, the pleats will come more to the front when compared to the plain salwar.
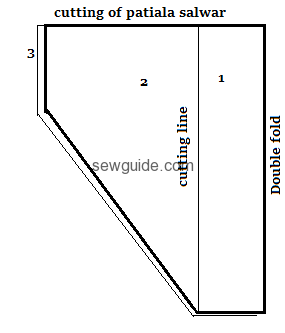
Layout of pattern pieces of Patiala on cloth.
Here is a more detailed tutorial to sew a Patiala Pants.
Side embroidered Salwar pants- Pattern cutting and stitching
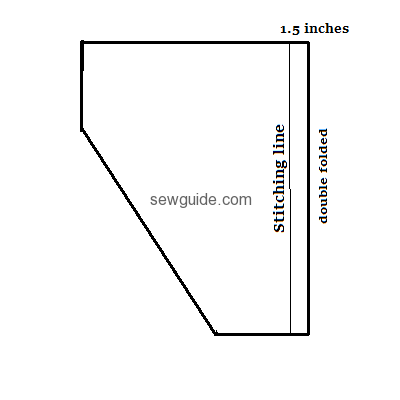
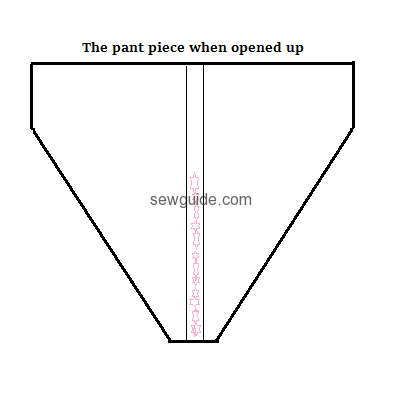
Side-embroidered salwar pants are cool and elegant if done right. For this to be done when marking the salwar, along the AE portion mark 1 ½ inches outside ie a total of 3 inches increase in the middle. Do the embroidery along the center of the area. Stitch along the AE line. Open the cloth, stitch along the both sides so that the embroidery lies flat in the middle of the pant piece.
Check out the post on various Indian Embroidery designs you can use on the embroidered pants. Mirror work , Eyelet embroidery or some Bullion knot roses would also look great . Any of the 12 border patterns ( hand embroidery ) would work as well.
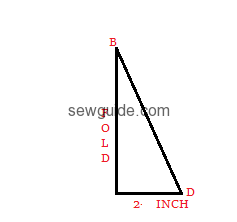
Dhothi pants – Pattern cutting and stitching
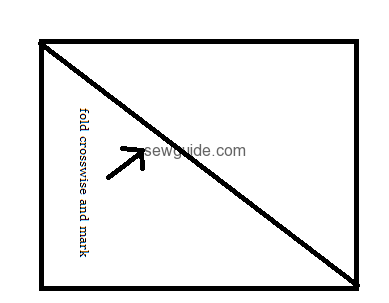
Dhothi pants is another variation of the Salwar . For dhothi pants we need to have wide cloth. Take the cloth fully and double the cloth Crosswise.
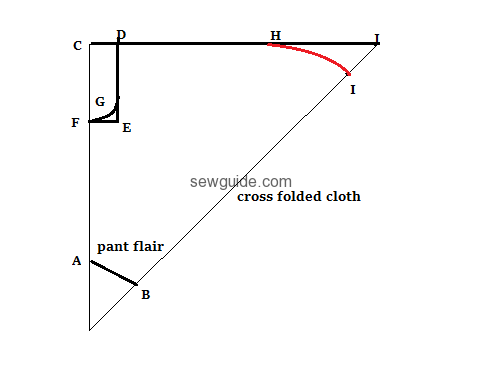
Mark on the cloth as given below :
A –B half of bottom round + 1 inch
A-C take full length + 1 inch – Waist piece (seven inches ) for adults take waist piece as 7 inches and for children 1/6 of seat round
C- J join point C straight till the top point and mark it as J
C-F one sixth of seat round + 1 inch
F-E take 1 ½ inch inside
E-D join straight upwards
E-G take quarter inch crosswise and give shape
J-H take 8 inches for everybody
J-I take 4 inches and give a curved shape
Make a waist piece just the way it is made in the Plain salwar portion. Joining the waist pieces and the pant pieces are the same as in the salwar pattern.
Churidhar Pants pattern cutting and stitching
For Chudidhar/churidhar Pants we have to fold the cloth diagonally (cross grain) for the correct stretch, otherwise the pants would not look good.
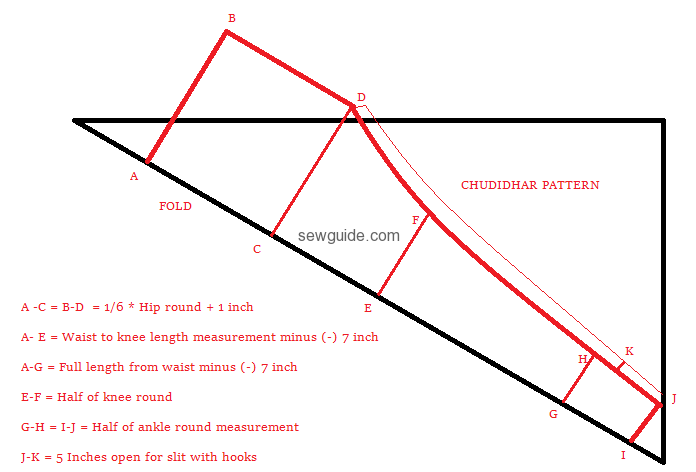
Join D – J in a softly curved line .
Mark 1 inch seam allowance along the line D-J.
As you have noticed, the pattern goes beyond the cloth; this happens with low-width cloths ( Which is the case with most pant pieces that come as a set); in such cases, we will have to attach extra pieces where it is marked 1 & 2. Please note that if you make the paper pattern for churidar pants, you can cut the cloth very accurately and easily.
Make the waist piece as in Plain salwar instructions.
You can also add a small triangular piece of cloth along the line B-D if you feel that you need some ease in the crotch area – this is optional. you can cut the pieces (2 for front and back) as in the diagram below
Attach the Kali pieces between the pant pieces along the lines B-D on the front and back. Join the leg portion along D- K leaving the slit. Stitch the slit portion by turning the seam twice inside. Make sure that you double-stitch the seam in the pant pieces as the crosswise grain will stretch the cloth causing cut stitches.
Join the waist pieces to the pant pieces as in the plain salwar and make ties and you are done.
You will need to sew 2 or three hooks for the opening in the legs along K – J . Checkout the tutorial to attach the hooks and make a thread bar for the hooks.
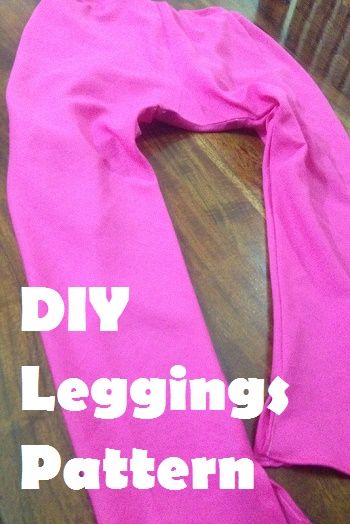
Checkout the DIY leggings pattern. Sewing leggings is similar to sewing the chudi pants; the gusset piece sewing and the ankle placket sewing for hooks are explained in detail in this tutorial.
Easy Parallel pants/ Palazzo pattern cutting and stitching
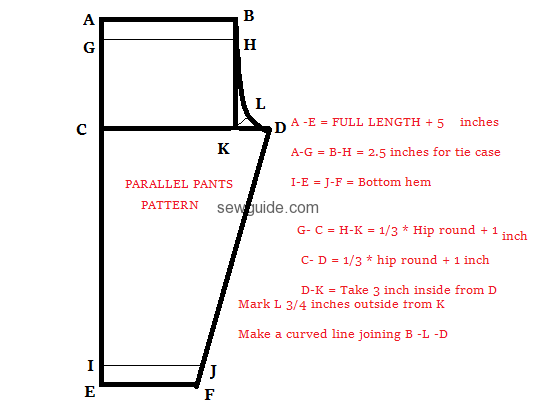
The bottom flair of Parallel pants can depend on personal preference, but usually, a round of 20 inches is normal so take I-J as 10 inches.
Open the cut pattern pieces. Stitch along B- D to join the pant pieces. Stitch the leg sides. Make pant hem.
Make the casing for elastic by folding the cloth inside; Leave a 1-inch gap to insert the elastic.
Elastic should be cut 1 inches less than the waist measurement for it to fit snugly around your waist.
Check out the Palazzo Pants stitching tutorial for an alternative to parallel pants
Also checkout the pajama pants pattern and sewing tutorial ( with side slash pockets)

If you are new to sewing and would like to learn sewing basics checkout my post on How to sew when you are just beginning
You may also want to check out
Free DIY Stitching patterns to sew your own clothes


I was excited to find this page, but having looked it over, I got lost on the very first diagram, which makes no sense to me. Specifically, the “B-C – 1/6 hip round + 1 inch”. B-C is a DIAGONAL. So how does this work? Completely confused as to how I would use 1/6 hip round to make this diagonal. Did you mean “B-D”?? I’m guessing that you did, but it’s so confusing, I’m giving up on your instructions and will go back to copying off the salwar I already own. You might want to clarify or fix this for the next person.
What you said is right, it is B-D and I am sorry for the oversight.Corrected. Thanks for pointing it out.
Very nice cutting& sewing literature thanks